Understanding Bathroom Sink Drain Plug Diagrams
The bathroom sink drain plug, often overlooked, is a critical component in the proper functioning of a lavatory. A well-functioning drain plug allows the sink to hold water for washing, shaving, or other tasks, while a malfunctioning drain can lead to frustration and potential water damage. Understanding the anatomy of a bathroom sink drain plug, typically illustrated in diagrams, is crucial for homeowners, plumbers, and anyone undertaking bathroom repairs or installations. A diagram provides a visual representation of the components and their relationships, aiding in troubleshooting, repair, and replacement.
This article will delve into the various types of bathroom sink drain plugs, dissect the common components found in a typical diagram, and explain their individual functions. Furthermore, it will address common problems encountered with drain plugs and how a diagram can aid in diagnosing and resolving these issues. Different actuation mechanisms and material considerations will also be explored, providing a comprehensive understanding of the entire system.
Different Types of Bathroom Sink Drain Plugs
Bathroom sink drain plugs come in various designs, each with its own advantages and disadvantages. Understanding these different types is fundamental before attempting any repair or replacement. Common types include:
Pop-Up Drain: The pop-up drain is perhaps the most prevalent type found in modern bathrooms. It operates via a lever, typically located behind the faucet, that actuates a rod connected to the drain plug. Pulling the lever lifts the plug, allowing water to drain, and pushing the lever down seals the drain. Its popularity stems from its ease of use and relatively simple mechanism.
Lift-and-Turn Drain: This type requires the user to manually lift and turn the drain plug to open or close it. The plug is often secured to a threaded post that screws into a corresponding receiver within the drain body. By twisting the plug, the user can raise or lower it, effectively sealing or unsealing the drain.
Push-Button Drain: As the name suggests, a push-button drain operates by pressing down on the plug itself. A ratcheting mechanism within the drain assembly allows the plug to toggle between open and closed positions with each press. This type is often preferred for its sleek and modern aesthetic.
Stopper Drain: The stopper drain, a more traditional design, often uses a rubber or metal stopper that is manually inserted into the drain opening to prevent water from escaping. It's a simple and reliable solution, although arguably less convenient than integrated mechanisms.
Grid Drain: Primarily used in sinks without overflows, a grid drain features a fixed grid-like structure at the drain opening. It allows water to drain freely while preventing large objects from entering the drainpipe. It does not have a mechanism to stop the water.
Key Components of a Bathroom Sink Drain Plug Diagram
A typical bathroom sink drain plug diagram will illustrate several key components, each playing a specific role in the drain's operation. Understanding these components is essential for troubleshooting and repair.
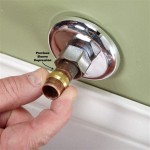
Drain Flange: This is the visible part of the drain that sits inside the sink basin. It usually has a decorative finish and is securely attached to the sink using plumber's putty or silicone sealant to create a watertight seal. The drain flange is typically threaded to accommodate the drain body.
Drain Body: The drain body is the main housing that connects to the drain flange and extends below the sink. It typically has threads to accommodate the tailpiece and other plumbing connections. In pop-up drains, the drain body also contains the pivot rod opening.
Pivot Rod: This rod connects the pop-up lever to the pop-up plug. It is inserted into the pivot rod opening in the drain body and manipulated by the pop-up lever to raise and lower the plug.
Pop-Up Lever (or Actuator Rod): Located behind the faucet, this lever controls the pivot rod, and consequently, the drain plug's position. Movement of the lever translates into movement of the pivot rod.
Pop-Up Plug (or Stopper): This is the actual plug that seals the drain opening. It is often made of metal or plastic and is designed to fit snugly against the drain flange to prevent water from escaping. In pop-up drains, the plug has a hole or slot to accommodate the pivot rod.
Tailpiece: The tailpiece is a pipe that connects to the bottom of the drain body and extends down to the P-trap. It allows water to flow from the sink drain to the drainage system.
P-Trap: The P-trap is a U-shaped pipe located below the sink. It traps water, preventing sewer gases from entering the bathroom. It connects to the tailpiece and the drainpipe leading to the main drainage system.
Retaining Nut: This nut secures the drain flange to the sink. It is tightened from underneath the sink, compressing the plumber’s putty or silicone sealant to create a watertight seal.
Spring Clip or Tension Spring: Found in some pop-up drain assemblies, this clip or spring provides tension to the pivot rod, ensuring that the pop-up plug stays in the desired position (either open or closed).
Common Problems and Diagram-Aided Troubleshooting
Several common problems can arise with bathroom sink drain plugs, often leading to a malfunctioning drain system. A drain plug diagram can be invaluable in diagnosing and resolving these issues efficiently.
Clogged Drain: A clogged drain is perhaps the most common problem. Hair, soap scum, and other debris can accumulate in the drainpipe, restricting water flow. A diagram helps locate the different components of the drain system, making it easier to disassemble and clean the affected areas.
Sticking or Slow Drain: This can be caused by mineral buildup, corrosion, or a misaligned pop-up mechanism. A diagram can help identify points of friction or obstruction within the drain assembly, allowing for targeted cleaning or lubrication.
Leaky Drain: Leaks can occur at various points, such as the drain flange, tailpiece connection, or P-trap. A diagram helps pinpoint the exact location of the leak, allowing for targeted repairs, such as tightening connections, replacing worn seals, or applying fresh plumber's putty.
Pop-Up Mechanism Failure: In pop-up drains, the pop-up lever, pivot rod, or spring clip can become damaged or disconnected, causing the drain plug to malfunction. A diagram clarifies the relationship between these components, allowing for easier diagnosis and replacement of the faulty part.
Improper Sealing: If the drain plug does not seal properly, water will slowly drain even when the plug is in the closed position. This can be due to a worn drain plug, a misaligned pivot rod, or insufficient tension in the pop-up mechanism. Careful examination of the diagram can reveal the cause of the problem and guide the necessary adjustments or replacements.
Corrosion: Over time, metallic components within the drain assembly can corrode, especially in areas with hard water. A diagram helps identify susceptible components, allowing for proactive maintenance or replacement with corrosion-resistant materials.
When troubleshooting, it is crucial to consult a specific diagram that matches the type of drain plug installed in the sink. Generic diagrams can be helpful for understanding the general principles, but a drain plug diagram specific to the sink's drain assembly will provide more precise information and facilitate more accurate troubleshooting. Many manufacturers provide detailed diagrams online or within the product documentation.
Proper maintenance, including regular cleaning and inspection, can prevent many of the aforementioned problems. Addressing minor issues promptly can prevent them from escalating into more significant and costly repairs. Regularly flushing the drain with hot water and occasionally using a drain cleaner can help prevent clogs. Inspecting the drain assembly for leaks or corrosion and tightening any loose connections can prolong the life of the drain system.
In conclusion, understanding the components of a bathroom sink drain plug, as illustrated in a diagram, is essential for effective troubleshooting, repair, and maintenance. By identifying the type of drain, understanding the function of each component, and recognizing common problems, homeowners and plumbers alike can ensure the proper functioning and longevity of their bathroom sink drain systems. Utilizing a specific and detailed diagram corresponding to sink's drain assembly will further improve the accuracy and efficiency of any maintenance or repair undertaken.

Bathroom Sink Pop Up Stopper Parts Diagram Drain Plug

20 Bathroom Faucet Drain Plug Check More At Https Www Michelenails Com 55 F Sink Stopper Install

How To Fix A Bathtub Or Sink Pop Up Stopper Bathroom Drain

Pin On Cleaning

How To Unclog A Bathroom Sink Larry Sons

Bathroom Sink Plumbing Diagram Drain

Pin By Eng Khaled On Sanitation Bathroom Sink Drain

Quick Tip 26 Pop Up Stopper Sticks Misterfix It Com

Bathroom Sink Plumbing Diagram Diy Sinks Drain Kitchen Remodel

Pin On Pte Marian
Related Posts