Bathroom Sink Drain Stopper Removal: A Comprehensive Guide
Bathroom sink drain stoppers, while essential for retaining water for washing and cleaning, can become problematic over time. Hair, soap scum, and other debris can accumulate, leading to clogs and hindering proper drainage. Furthermore, the stopper mechanism itself can malfunction, requiring removal for repair or replacement. This article provides a comprehensive guide to various types of bathroom sink drain stoppers and the methods used to remove them safely and effectively.
Before attempting any drain stopper removal, it is crucial to identify the type of stopper in question. Different stopper designs employ different removal mechanisms, and using the wrong approach can damage the stopper, the drain assembly, or even the sink itself. Common types of bathroom sink drain stoppers include pop-up stoppers, lift-and-turn stoppers, push-and-seal stoppers, and grid stoppers.
Identifying Your Drain Stopper Type
Accurate identification is the first step towards successful removal. Each type of stopper has distinct visual cues and operational characteristics. Properly identifying the type of stopper present will ensure that the correct removal method is applied, minimizing the risk of damage and simplifying the process.
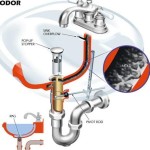
Pop-Up Stoppers: These are arguably the most common type of bathroom sink drain stopper. They are characterized by a lever or knob located behind the faucet. This lever is connected to a pivot rod that extends down to a linkage mechanism located beneath the sink. When the lever is raised or lowered, it manipulates the pivot rod, causing the stopper to move up (open) or down (closed).
Lift-and-Turn Stoppers: These stoppers are operated by lifting and turning the stopper itself. The stopper typically has a knob or handle that allows the user to grasp it and rotate it, engaging or disengaging a locking mechanism inside the drain. These are easily identified by their lack of external linkage and the visible turning action to operate the drain.
Push-and-Seal Stoppers: Also known as push-button stoppers, these require a simple push downwards to seal the drain and another push to release it. The mechanism is entirely contained within the stopper itself, and no external linkage is visible. These stoppers often have a rounded or slightly domed appearance.
Grid Stoppers: These are the simplest type of stopper, featuring a fixed grid pattern that prevents large objects from entering the drain while allowing water to flow freely. They typically do not have any moving parts and are either held in place by friction or secured with a screw.
General Safety Precautions
Prior to initiating any drain stopper removal procedure, it is essential to prioritize safety. This involves taking necessary precautions to protect oneself and prevent damage to the plumbing system. Adhering to these general safety measures will help ensure a safe and effective removal process.
Wear Protective Gloves: Bathroom sink drains can harbor bacteria and other contaminants. Wearing rubber or latex gloves during the removal process minimizes the risk of exposure to these harmful substances.
Protect the Sink Surface: Drain stopper removal can sometimes involve the use of tools that might scratch or damage the sink's surface. Placing a towel or protective padding around the drain opening prevents accidental damage.
Shut Off the Water Supply: Although not always strictly necessary, turning off the water supply to the faucet can prevent accidental water damage if the drain assembly is inadvertently disturbed during the removal process. Locate the shut-off valves beneath the sink and turn them clockwise to shut off the water.
Have a Container Ready: Removing a drain stopper often releases trapped water and debris. Having a bucket or container readily available beneath the sink will catch this water and prevent it from spilling onto the floor.
Detailed Removal Procedures for Different Stopper Types
Once the stopper type has been identified and safety precautions have been implemented, the appropriate removal procedure can be initiated. The following sections detail the specific steps required to remove each type of bathroom sink drain stopper.
Pop-Up Stopper Removal:
1. Locate the Pivot Rod: The pivot rod is typically located beneath the sink, connected to the drainpipe. It is a horizontal rod that passes through a hole in the tailpiece (the vertical pipe extending down from the drain). A spring clip usually secures the pivot rod to the stopper linkage.
2. Disconnect the Pivot Rod: Carefully remove the spring clip that secures the pivot rod. Once removed, the pivot rod can be pulled out from the tailpiece. Be prepared for some water to drain out when the pivot rod is removed.
3. Remove the Stopper: With the pivot rod removed, the stopper should now be free to lift out of the drain. If it is stuck, gently wiggle it back and forth while pulling upwards. Inspect the stopper for any accumulated debris or corrosion that may be causing it to stick.
Lift-and-Turn Stopper Removal:
1. Locate the Locking Mechanism: Most lift-and-turn stoppers have a small screw or set screw located on the side of the stopper near the top. This screw secures the stopper to the internal drain mechanism.
2. Loosen the Set Screw: Use a small Allen wrench or screwdriver to loosen the set screw. Do not remove the screw completely, as it can be difficult to re-install. Only loosen it enough to allow the stopper to be lifted out.
3. Remove the Stopper: Once the set screw is loosened, gently lift and turn the stopper counterclockwise. This should disengage the locking mechanism and allow the stopper to be removed from the drain. If the stopper is stuck, apply a small amount of penetrating oil around the base and let it sit for a few minutes before attempting to remove it again.
Push-and-Seal Stopper Removal:
1. Determine the Stopper Style: Some push-and-seal stoppers can be unscrewed, while others are held in place by friction or a hidden clip. Examine the stopper carefully to determine which style is present.
2. Unscrew the Stopper (if applicable): If the stopper appears to have threads, try unscrewing it by turning it counterclockwise. Apply gentle pressure while turning. If it does not unscrew easily, do not force it.
3. Remove the Stopper by Prying (if applicable): If the stopper does not unscrew and appears to be held in place by friction, carefully pry it up using a small flathead screwdriver. Wrap the tip of the screwdriver with tape to prevent scratching the drain. Work your way around the perimeter of the stopper, gently prying it upwards until it comes loose.
4. Check for a Clip (if applicable): Some push-and-seal stoppers have a clip hidden beneath the stopper's head. This clip needs to be disengaged before the stopper can be removed. Consult the manufacturer's instructions or online resources for specific guidance on disengaging the clip for your particular model.
Grid Stopper Removal:
1. Check for a Screw: Some grid stoppers are secured with a small screw located in the center of the grid. If a screw is present, remove it with a screwdriver.
2. Remove the Stopper: With the screw removed (if applicable), the grid stopper should be free to lift out of the drain. If it is stuck, gently wiggle it back and forth while pulling upwards.
3. Prying (If Necessary): If the grid stopper is tightly wedged into the drain and does not come out easily by hand, carefully use a small flathead screwdriver to gently pry around the edge. Protect the sink's surface with tape or a cloth.
Once removed, thoroughly clean the drain stopper and the drain opening to remove any accumulated debris. This will help prevent future clogs and ensure proper drainage. If replacing the stopper, install the new stopper following the manufacturer's instructions.

How To Remove A Bathroom Sink Stopper Take Out Pop Up Drain From

Quick Tip 26 Pop Up Stopper Sticks Misterfix It Com

How To Remove A Sink Stopper Quick Easy Guide

How To Remove A Sink Stopper The Home Depot

How To Fix A Bathroom Sink Drain Stopper 4 Easy Solutions

Fixing Tricky Pop Up Drain Sink Stopper Mechanisms Efficient Plumber

How To Replace A Sink Stopper Quick And Simple Home Repair

Complete Guide Fixing A Sink Stopper Step By Instructions

How To Remove A Sink Stopper The Home Depot

How To Replace A Pop Up Sink Drain Remove The Old Bathroom Stopper Repair
Related Posts


