Can You Make a Dresser Into a Bathroom Vanity? A Comprehensive Guide
Repurposing furniture is a growing trend in home renovation, driven by a desire for unique aesthetics, sustainability, and cost-effectiveness. One increasingly popular project involves converting a vintage or unused dresser into a bathroom vanity. This approach offers a personalized design element that stands out from standard, mass-produced vanities while potentially saving money and reducing waste. However, transforming a dresser into a functional and aesthetically pleasing bathroom vanity requires careful planning, preparation, and execution. This article will explore the process, outlining the considerations, steps, and potential challenges involved in this DIY endeavor.
The feasibility of converting a dresser into a bathroom vanity hinges primarily on the dresser's dimensions, construction, and style. Not all dressers are suitable for this transformation. Evaluating these factors is the crucial first step.
Assessing the Dresser’s Suitability
The dimensions of the dresser must align with the available space in the bathroom and the desired height for a vanity. Standard bathroom vanity heights typically range from 30 to 36 inches. A dresser that is significantly shorter may require modification by adding legs or a platform to achieve a comfortable height. Conversely, a dresser that is too tall might necessitate cutting it down, a more complex task that can compromise the structural integrity of the piece.
The construction of the dresser is another critical factor. Solid wood construction is generally preferred as it offers greater durability and resistance to moisture compared to particleboard or MDF (medium-density fiberboard). While particleboard and MDF can be used, they are more susceptible to water damage and may require more extensive sealing and protection. The drawer construction also matters; drawers that are dovetailed or feature solid wood framing are more likely to withstand the rigors of daily use in a bathroom environment.
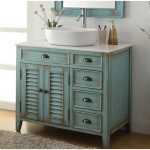
Finally, the style of the dresser should complement the overall aesthetic of the bathroom. A dresser with ornate details may be ideal for a traditional or vintage-inspired bathroom, while a dresser with clean lines and a minimalist design may be more suitable for a modern or contemporary space. The existing finish of the dresser can also be a consideration; a dark wood finish may work well in a bathroom with light-colored walls and fixtures, while a painted finish may be preferable in a bathroom with darker elements. The dresser's inherent style should be carefully considered to ensure it integrates seamlessly with the bathroom's overall design.
Preparing the Dresser for Modification
Once a suitable dresser has been identified, the next step involves preparing it for modification. This process typically includes cleaning, sanding, and applying protective coatings.
Thorough cleaning is essential to remove any dirt, grime, or old finishes that may interfere with subsequent steps. A mild detergent and water solution is usually sufficient for cleaning, followed by a thorough rinsing and drying. For stubborn stains or buildup, a stronger cleaning agent may be necessary, but caution should be exercised to avoid damaging the finish.
Sanding is often required to create a smooth surface for painting or staining, and to remove any imperfections in the existing finish. The grit of sandpaper used will depend on the condition of the dresser. For removing old paint or varnish, a coarser grit (e.g., 80-120 grit) may be necessary. For smoothing the surface and preparing it for a new finish, a finer grit (e.g., 220-320 grit) is recommended. It is important to sand evenly and in the direction of the wood grain to avoid creating scratches or swirl marks.
After sanding, it is crucial to apply protective coatings to seal the wood and protect it from moisture. A primer should be applied first to improve adhesion and prevent the finish coat from soaking into the wood. Multiple coats of paint or stain should then be applied, followed by a clear topcoat for added protection and durability. The choice of paint or stain will depend on the desired aesthetic and the materials used in the dresser's construction. Oil-based paints and stains are generally more durable and water-resistant than water-based options, but they also release more volatile organic compounds (VOCs). Water-based paints and stains are a more environmentally friendly alternative, but they may require more coats for adequate coverage and protection.
In addition to sealing the exterior of the dresser, it is also important to seal the interior, especially around the area where the sink and plumbing will be installed. This will help to prevent water damage and mold growth.
Modifying the Dresser for Plumbing and Sink Installation
The most technically challenging aspect of converting a dresser into a bathroom vanity is modifying it to accommodate the sink and plumbing. This typically involves cutting holes for the sink drain and faucet, as well as creating space for the plumbing pipes.
Before making any cuts, it is essential to carefully measure and plan the placement of the sink and faucet. The sink should be positioned in a way that is both functional and aesthetically pleasing, and the faucet should be compatible with the sink's design. A template can be created to guide the cutting process. This template should be accurately positioned on the dresser's top, and the outline of the sink and faucet should be carefully traced.
Using a jigsaw or hole saw, carefully cut out the openings for the sink drain and faucet. It is important to cut slowly and precisely to avoid damaging the surrounding wood. After cutting, the edges of the openings should be sanded smooth to remove any splinters or rough edges. The interior of the cabinet will likely need to be modified to accommodate the plumbing lines. This may require removing or adjusting drawers and shelves, or cutting holes in the back of the dresser. Care should be taken to avoid cutting through any structural supports.
Once the plumbing modifications are complete, the sink and faucet can be installed. The sink should be securely mounted in the opening, and the faucet should be connected to the water supply lines. It is important to use the correct plumbing fittings and to ensure that all connections are watertight. A plumber may be necessary for this step, especially if the plumbing is complex or if there are concerns about code compliance.
After the sink and faucet are installed, the drawers and shelves can be reinstalled or modified to fit around the plumbing. The drawers may need to be shortened or narrowed to avoid interfering with the pipes. Alternatively, custom drawers can be built to fit the available space. Consideration should also be given to providing adequate ventilation around the plumbing to prevent mold growth. This can be achieved by drilling holes in the back of the dresser or by leaving gaps between the drawers and the cabinet.
Finally, consider the backsplash. A backsplash, typically made of tile or stone, protects the wall behind the vanity from water damage and adds a decorative touch. The backsplash should be installed after the sink and faucet are in place, ensuring a seamless transition between the vanity and the wall.
Converting a dresser into a bathroom vanity is a rewarding project that can transform a discarded piece of furniture into a unique and functional addition to the bathroom. However, it requires careful planning, preparation, and execution. By following the steps outlined in this article, and by enlisting the help of a plumber or other professional when needed, it is possible to create a beautiful and personalized bathroom vanity that will be enjoyed for years to come.

How To Make A Dresser Into Vanity Tutorial An Oregon Cottage

A Pro Renovator S 6 Tips For Turning Dresser Into Bathroom Vanity

Repurposed Dresser Converted To Bathroom Vanity Reinvented Delaware

Turn A Vintage Dresser Into Bathroom Vanity

Flipping Houses Home Renovation In Silicon Valley

Stunning Bathroom Tour Dresser Into Double Vanity

Mid Century Dresser Into Vanity Bright Green Door
/103058794-9279662b921c41259cb908f3cb19acd9.jpg?strip=all "How To Turn An Old Dresser Into A Beautiful Bathroom Vanity")
How To Turn An Old Dresser Into A Beautiful Bathroom Vanity

How To Convert A Dresser Into Bathroom Vanity The Little By Home

Repurposed Dresser Converted To Bathroom Vanity Reinvented Delaware
Related Posts