Cleaning a Delta Bathroom Faucet Aerator
Bathroom faucets are essential fixtures in any home, providing a reliable source of water for various tasks. Over time, however, the aerator, a small component at the end of the spout, can become clogged with mineral deposits, debris, and sediment. This can lead to reduced water pressure, a sputtering stream, and even an uneven flow. Fortunately, cleaning a Delta bathroom faucet aerator is a relatively straightforward process that can restore the faucet's functionality and enhance the user experience.
Understanding the Aerator
The aerator is a small, removable part that sits at the end of the faucet spout. Its primary function is to mix air with water, creating a smoother, more consistent stream. The aerator's design typically includes a mesh screen that filters out larger particles. However, over time, this screen can become clogged with mineral deposits, such as calcium and magnesium, or other debris, restricting the water flow.
Delta bathroom faucets often feature a unique aerator design with a removable cap. This cap protects the aerator's internals and allows for easy access during cleaning. The aerator is usually held in place by a small retaining nut, which can be easily dislodged to remove the aerator for cleaning.
Steps for Cleaning a Delta Bathroom Faucet Aerator
Cleaning a Delta bathroom faucet aerator is a simple process that can be completed with household supplies. Here's a step-by-step guide:
- Turn off the water supply. Locate the shut-off valve for the faucet and turn it off to prevent water from flowing during the cleaning process.
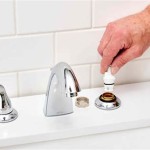
- Remove the aerator. Gently unscrew the aerator from the faucet spout. The aerator may be held in place by a small retaining nut. If the aerator is difficult to remove, use a pair of pliers or a wrench to gently loosen it. Be careful not to overtighten or damage the faucet.
- Disassemble the aerator. Once the aerator is removed, you can disassemble it to gain access to the internal parts. Typically, the aerator will have a cap that can be unscrewed, revealing the mesh screen and other components.
- Clean the aerator components. Use a small toothbrush or a cleaning brush to scrub away any mineral deposits, dirt, or debris from the screen and other parts. You can also soak the components in a solution of white vinegar or a commercial descaler for a few minutes to help loosen stubborn deposits.
- Rinse the components. After cleaning, thoroughly rinse the aerator components with water to remove any remaining debris or cleaning solution.
- Reassemble the aerator. Carefully reassemble the aerator components, ensuring that the screen is properly seated and the cap is securely tightened.
- Reinstall the aerator. Carefully thread the aerator back onto the faucet spout, ensuring it is tightened securely but not overtightened.
- Turn on the water supply. Once the aerator is reinstalled, turn the shut-off valve back on and check for leaks. Run the water for a few minutes to flush out any remaining debris.
Tips for Maintaining a Clean Aerator
Regularly cleaning your Delta bathroom faucet aerator is essential for optimal performance and longevity. Here are a few tips for maintaining a clean aerator:
- Clean the aerator at least once a year. This will help prevent mineral deposits from building up and clogging the screen.
- Use a water softener. A water softener can help reduce the amount of minerals in your water, which can help prevent mineral buildup on the aerator.
- Avoid using harsh chemicals. When cleaning the aerator, avoid using abrasive cleaners or chemicals that could damage the components.
- Inspect the aerator regularly. Periodically check the aerator for any signs of damage or wear, such as cracks or scratches.
- Replace the aerator when necessary. If the aerator is severely worn or damaged, it should be replaced to ensure optimal water flow and performance.
By following these tips, you can ensure that your Delta bathroom faucet aerator remains clean and functional, providing a smooth and consistent water stream for years to come.

How To Fix Your Flow Delta Faucet Blog

Delta Faucet Aerator Cleaning How To Remove Clean Install New Replace Aerators

How To Clean And Replace An Aerator By Delta

How To Clean A Delta Faucet

How To Clean A Faucet Aerator Or Showerhead Plumb Works Academy

How To Clean A Bathroom Sink Faucet Aerator Screen Low Water Pressure

How To Clean Debris Out Of A Bathroom Faucet Aerator Sbw 70 Sean Moenkhoff

How To Clean Faucet Aerators

How To Clean Debris Out Of A Bathroom Faucet Aerator Sbw 70 Sean Moenkhoff

Delta Cache Aerator Wrench Rp52217 The Home Depot
Related Posts