Delta Bathroom Faucet Cartridge Repair Kit: A Comprehensive Guide
A dripping faucet is more than just an annoyance; it represents wasted water and potentially higher water bills. In many cases, the source of the leak resides within the faucet cartridge. Delta, a leading manufacturer of bathroom fixtures, provides readily available repair kits specifically designed to address these cartridge-related issues. This article provides a comprehensive overview of Delta bathroom faucet cartridge repair kits, exploring their purpose, components, identification process, repair procedure, and essential considerations for a successful outcome.
The primary function of a faucet cartridge is to control the flow and temperature of water. Over time, due to mineral buildup, wear and tear on rubber seals, or general degradation of the cartridge material, the cartridge can malfunction, leading to dripping or reduced water flow. Replacing the entire faucet fixture can be costly and often unnecessary. Delta bathroom faucet cartridge repair kits offer a cost-effective and environmentally responsible solution by allowing the replacement of only the problematic component: the cartridge itself.
These repair kits are typically designed for DIY installation, though professional plumbing assistance may be sought for complex situations or if the homeowner lacks experience with plumbing repairs. Understanding the purpose and contents of the kit is paramount to successful repair and preventing future issues.
Identifying the Correct Delta Faucet Cartridge Repair Kit
One of the most critical steps in the repair process is identifying the correct replacement cartridge. Delta faucets utilize various cartridge designs, and using the wrong one will render the repair ineffective. Fortunately, Delta provides several methods for identifying the appropriate cartridge for a specific faucet model.
The most reliable method is to consult the faucet's original documentation. This documentation, which should have been provided at the time of installation, typically includes the faucet model number and a parts list detailing the specific cartridge used. If the documentation is unavailable, the Delta website and customer support channels are valuable resources. The Delta website features a comprehensive parts finder tool that allows users to search for parts based on faucet model number or even visual characteristics. Providing detailed images of the existing cartridge can also assist Delta customer support in identifying the correct replacement.
Another method involves carefully inspecting the existing cartridge. Cartridges often have identifying markings or numbers molded into their plastic body. These markings can be cross-referenced with Delta's online resources or provided to customer support for identification. However, it's crucial to note that these markings can sometimes be worn or difficult to read, requiring careful examination and potentially magnification.
Finally, some universal or semi-universal Delta cartridge repair kits may exist, designed to fit a range of faucet models. However, relying on these kits without thorough confirmation of compatibility can lead to problems. It's generally recommended to identify the exact cartridge model for optimal performance and longevity.
Misidentification of the cartridge can lead to purchasing the incorrect repair kit, resulting in wasted time and resources. It can also potentially damage the faucet if an incompatible cartridge is forced into place. Therefore, diligence in identifying the correct cartridge is paramount.
Components of a Typical Delta Faucet Cartridge Repair Kit
While the specific components may vary slightly depending on the faucet model and the nature of the repair kit, a typical Delta bathroom faucet cartridge repair kit generally includes the following:
The Replacement Cartridge: This is the core component of the kit. It is a pre-assembled unit containing the internal mechanisms that control water flow and temperature mixing. Cartridges are typically constructed from durable plastic and contain rubber O-rings and seals that ensure a watertight connection.
O-Rings and Seals: These small rubber components create a watertight seal between the cartridge and the faucet body. Over time, these seals can deteriorate, harden, or crack, leading to leaks. The kit usually includes a set of replacement O-rings and seals to address this issue.
Retaining Clip or Nut: This component secures the cartridge within the faucet body. It may be a metal clip or a plastic nut that prevents the cartridge from dislodging during operation. The kit may include a replacement retaining clip or nut if the original is damaged or missing.
Specialized Tools: Some kits may include specialized tools, such as a cartridge removal tool. This tool is designed to grip the cartridge securely and facilitate its removal from the faucet body, especially if the cartridge is stuck due to mineral buildup.
Silicone Grease: A small tube of silicone grease is often included. This grease is applied to the O-rings and seals during installation to lubricate them and ensure a proper seal. It also helps to prevent the seals from drying out and cracking prematurely.
Installation Instructions: A detailed set of instructions is crucial for a successful repair. These instructions typically include step-by-step guidance on removing the old cartridge, cleaning the faucet body, lubricating the new seals, and installing the new cartridge.
Carefully examining the contents of the repair kit before starting the repair process is essential. Ensuring that all necessary components are present and intact will help to avoid delays and frustrations during the repair.
Step-by-Step Guide to Replacing a Delta Faucet Cartridge
Replacing a Delta faucet cartridge is a relatively straightforward process, but it requires careful attention to detail and adherence to the manufacturer's instructions. The following steps provide a general guide, but it is always recommended to consult the specific instructions included with the repair kit.
Step 1: Shut Off the Water Supply: Before beginning any plumbing work, it is imperative to shut off the water supply to the faucet. This can typically be done by closing the shut-off valves located beneath the sink. If shut-off valves are not present, the main water supply to the house must be shut off.
Step 2: Remove the Faucet Handle: The faucet handle must be removed to access the cartridge. The handle is typically secured by a setscrew, which may be concealed by a decorative cap. Use an Allen wrench or screwdriver to loosen the setscrew and remove the handle.
Step 3: Disassemble the Faucet Trim: Depending on the faucet model, additional trim pieces may need to be removed to access the cartridge. This may include escutcheons, sleeves, or decorative rings. Carefully remove these components, noting their orientation for reassembly.
Step 4: Remove the Retaining Clip or Nut: Locate the retaining clip or nut that secures the cartridge within the faucet body. Use pliers or a wrench to remove the clip or nut. Exercise caution to avoid damaging the faucet body or the surrounding components.
Step 5: Remove the Old Cartridge: Once the retaining clip or nut is removed, the old cartridge can be pulled out. If the cartridge is stuck, use the cartridge removal tool (if provided) or gently wiggle the cartridge back and forth while pulling. Avoid using excessive force, as this could damage the faucet body.
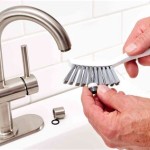
Step 6: Clean the Faucet Body: After removing the old cartridge, thoroughly clean the faucet body to remove any mineral deposits, debris, or corrosion. Use a soft cloth or brush and a mild cleaning solution. Rinse the faucet body with clean water and dry it thoroughly.
Step 7: Lubricate the New Seals: Apply a thin layer of silicone grease to the O-rings and seals on the new cartridge. This will ensure a proper seal and prevent the seals from drying out prematurely.
Step 8: Install the New Cartridge: Insert the new cartridge into the faucet body, aligning it properly. Ensure that the cartridge is fully seated and that the O-rings and seals are properly positioned.
Step 9: Reinstall the Retaining Clip or Nut: Secure the new cartridge with the retaining clip or nut. Tighten the clip or nut securely, but avoid over-tightening it, as this could damage the cartridge or faucet body.
Step 10: Reassemble the Faucet Trim and Handle: Reinstall the faucet trim pieces and handle, ensuring that they are properly aligned and secured. Tighten the setscrew on the handle to prevent it from loosening.
Step 11: Turn on the Water Supply: Slowly turn on the water supply and check for leaks. If any leaks are present, tighten the retaining clip or nut slightly. If the leaks persist, re-examine the installation to ensure that all components are properly seated and sealed.
Step 12: Test the Faucet: Test the faucet by turning it on and off and adjusting the water temperature. Ensure that the water flows smoothly and that there are no drips or leaks.
Following these steps carefully and adhering to the manufacturer's instructions will help to ensure a successful cartridge replacement and prevent future problems.
It is important to note that if the faucet body itself is damaged or corroded, replacing the cartridge may not resolve the leak. In such cases, replacing the entire faucet fixture may be necessary.

Delta Stem Cartridge Repair Kit Rp42096 The Home Depot

Repair Kit Bathroom Rp77738 Delta Faucet

Danco Metal Faucet Repair Kit Delta Delex In The Kits Components Department At Com

Repair Kit Bathroom Rp77739 Delta Faucet

Delta Monitor 17 Series Cartridge Assembly Kit Rp32104 Rona

Delta Plastic Tub Shower Cartridge Repair Kit In The Faucet Kits Components Department At Com

Repair Kit Ball Seats Springs Cam Cap Adjusting Ring Bonnet In Chrome Rp77763 Delta Faucet

Plumb Delta Rless Cartridge Faucet Repair Kit 2 Handle 1 Pk Canadian Tire

Delta Faucet Repair Kit Rp44123 The Home Depot

Danco 86970 Cartridge Repair Kit For Delta Single Handle Fauce Brass


