DIY Bathroom Vanity Undermount Sink: A Comprehensive Guide
Creating a custom bathroom vanity with an undermount sink is a rewarding project that allows homeowners to personalize their space and potentially save money compared to purchasing a pre-made unit. This article provides a detailed guide to constructing a DIY bathroom vanity with an undermount sink, covering essential considerations, material selection, construction techniques, and installation procedures.
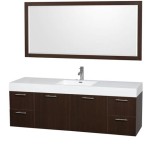
The undermount sink style, where the sink is installed beneath the countertop, offers several advantages. It provides a clean, seamless look that is easy to maintain, as debris can be wiped directly into the sink. This aesthetic and functional appeal makes it a popular choice for modern bathroom designs.
Planning and Design Considerations
Before embarking on this DIY project, meticulous planning is crucial. Careful consideration should be given to the overall design, dimensions, material selection, and plumbing requirements. A well-thought-out plan will help ensure a smooth and successful construction process.
First, measure the available space in the bathroom where the vanity will be located. This includes width, depth, and height. Account for any existing plumbing fixtures, such as water supply lines and drain pipes. Consider the ideal height of the vanity based on user preferences. Standard vanity heights typically range from 30 to 36 inches.
Next, determine the desired style and functionality of the vanity. Consider whether the vanity will have drawers, cabinets, or a combination of both. Plan the layout of these components to maximize storage space and accessibility. Decide on the type of door hardware and drawer pulls that will complement the overall design. Visualize the finished product and create a detailed sketch or digital rendering to guide the construction process.
Selecting the right undermount sink is crucial. Consider the size and shape of the sink, as well as the material it is made from. Common materials for undermount sinks include porcelain, stainless steel, and composite materials. Choose a sink that complements the overall design of the vanity and meets the functional needs of the user. Ensure that the sink comes with a template for cutting the countertop opening.
Countertop material selection is another important consideration. Popular choices include solid surface materials like quartz or granite, as well as wood, laminate, and tile. Solid surface materials offer durability and water resistance, but can be more expensive and require specialized cutting tools. Wood countertops provide a warm and natural look but require proper sealing to prevent water damage. Laminate countertops are a cost-effective option, but may not be as durable as other materials.
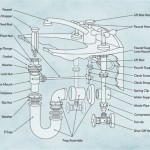
Finally, plan for the plumbing. Consider the location of the existing water supply lines and drain pipe. Determine whether any modifications to the plumbing will be necessary to accommodate the new vanity. It may be necessary to consult with a licensed plumber to ensure that the plumbing connections are properly installed and meet local codes. Consider the location of the drain relative to the sink bowl; an offset drain may be preferable in some designs to maximize cabinet space.
Materials and Tools Required
Gathering the necessary materials and tools is essential for a successful DIY vanity project. The specific materials and tools required will depend on the design and construction methods employed. However, a general list includes the following:
- Lumber or Plywood: Used for constructing the vanity frame, cabinets, and drawers. Choose a wood species that is suitable for bathroom environments, such as moisture-resistant plywood or hardwood.
- Countertop Material: Select the desired countertop material, such as solid surface, wood, laminate, or tile.
- Undermount Sink: Choose an undermount sink that complements the vanity design and meets the functional needs of the user.
- Sink Mounting Hardware: Includes clips, screws, and epoxy adhesive for securing the undermount sink to the countertop.
- Cabinet Doors and Drawer Fronts: Select pre-made doors and drawer fronts or build them from scratch using lumber or plywood.
- Door Hinges and Drawer Slides: Choose hinges and slides that are appropriate for the size and weight of the doors and drawers. Soft-close options are often preferred.
- Door and Drawer Hardware: Select knobs or pulls that complement the overall design.
- Fasteners: Includes screws, nails, and wood glue for assembling the vanity frame and components.
- Sealant: Use a waterproof sealant to protect the vanity from moisture damage. Silicone caulk is a common choice.
- Plumbing Supplies: Includes water supply lines, drain pipes, and fittings for connecting the sink to the existing plumbing.
- Safety Gear: Includes safety glasses, gloves, and a dust mask to protect against injury and dust exposure.
Tools Required:
- Measuring Tape: Essential for accurate measurements.
- Pencil: For marking cutting lines and assembly points.
- Level: For ensuring that the vanity is level and plumb.
- Circular Saw or Table Saw: For cutting lumber and plywood to size.
- Jigsaw: For cutting curved or intricate shapes.
- Drill/Driver: For drilling pilot holes and driving screws.
- Screwdriver: For manually driving screws.
- Router: For creating decorative edges or rebates (optional but useful).
- Sander: For smoothing rough edges and surfaces.
- Clamps: For holding pieces together while gluing.
- Caulk Gun: For applying sealant.
- Hole Saw: For drilling holes for the sink drain and faucet.
- Stud Finder: To locate wall studs for secure mounting.
Construction and Installation Procedures
The construction process involves assembling the vanity frame, building cabinets and drawers, installing the countertop and undermount sink, and connecting the plumbing. Careful attention to detail and accurate measurements are essential for a professional-looking result.
Begin by constructing the vanity frame. Cut the lumber or plywood to the required dimensions based on the design plan. Assemble the frame using screws, nails, and wood glue. Ensure that the frame is square and level.
Next, build the cabinets and drawers. Cut the lumber or plywood to the required dimensions for the cabinet sides, top, bottom, and back. Assemble the cabinets using screws, nails, and wood glue. Install the drawer slides on the cabinet sides.
Build the drawer boxes using lumber or plywood. Cut the pieces to the required dimensions and assemble them using screws, nails, and wood glue. Install the drawer fronts using screws and adhesive. Ensure that the drawers slide smoothly on the drawer slides.
Prepare the countertop. If using a solid surface material, have it professionally cut to size, including the cutout for the undermount sink. If using wood, laminate, or tile, cut the countertop material to size using the appropriate tools. Seal the wood countertop with a waterproof sealant to protect it from moisture damage. Using the template provided with the sink, carefully mark and cut the opening for the undermount sink. A router can be used to create a clean, smooth edge.
Install the undermount sink. Clean the underside of the countertop around the sink opening. Apply epoxy adhesive to the rim of the sink and position it under the countertop opening. Secure the sink using the mounting hardware provided, such as clips and screws. Allow the adhesive to cure completely according to the manufacturer's instructions.
Install the countertop onto the vanity frame. Apply a bead of silicone caulk to the top of the vanity frame and carefully lower the countertop into place. Secure the countertop to the frame using screws from underneath. Ensure that the countertop is level and aligned properly.
Install the cabinet doors using hinges. Adjust the hinges to ensure that the doors open and close smoothly. Install the door and drawer hardware, such as knobs or pulls.
Connect the plumbing. Turn off the water supply to the bathroom. Connect the water supply lines to the sink faucet. Connect the drain pipe to the sink drain. Ensure that all connections are tight and leak-free. It is often advisable to hire a professional plumber to perform plumbing connections, especially if you are uncomfortable or unfamiliar with plumbing codes.
Finally, apply sealant around the edges of the countertop and sink to prevent water damage. Allow the sealant to dry completely according to the manufacturer's instructions.
.jpg?strip=all "How To Turn A Dresser Into Bathroom Vanity")
How To Turn A Dresser Into Bathroom Vanity

Bathroom Butcher Block Counter With Undermount Sink Countertops Diy Wood Countertop Vanities

Diy Floating Bathroom Vanity Remodelando La Casa

A Custom Godmorgon Vanity Jenna Sue Design

Diy Wood Bathroom Countertop An Easy Way To Change Your Vanity In 1 Weekend Noting Grace

Diy Floating Bathroom Vanity Remodelando La Casa

Diy Butcher Block Vanity Beneath My Heart

How To Install An Undermount Sink

Shallow Undermount Bathroom Sink Addicted 2 Decorating

Undermount Bathroom Sink Buyer S Guide The Family Handyman
Related Posts