How to Loosen a Tight Bathroom Tap
A persistently tight bathroom tap presents a common household frustration. The inability to easily turn the tap can lead to wasted water, increased strain on plumbing components, and general inconvenience. Addressing a stiff tap requires methodical troubleshooting and, in some cases, practical repairs. This article outlines potential causes of tight bathroom taps and provides detailed instructions for loosening them effectively.
Identifying the Cause of a Stiff Tap
Before attempting any repairs, understanding the underlying reason for the tap's stiffness is crucial. Several factors can contribute to this issue, and identifying the root cause allows for a more targeted and successful solution. Common culprits include mineral buildup, corrosion, worn-out components, and improper tap installation.
Mineral buildup, primarily calcium and magnesium deposits from hard water, is a frequent offender. These minerals accumulate over time within the tap's internal mechanisms, restricting movement and making it difficult to turn. Corrosion, particularly in older taps, can also impede smooth operation. Rust and other forms of corrosion can bind moving parts together, causing stiffness. O-rings and washers, essential for creating watertight seals, degrade with age and use. When these components become worn or brittle, they can create friction and resistance within the tap assembly. Finally, an initially incorrect or overly tight installation can lead to premature wear and stiffness.
To diagnose the specific cause, observe the tap closely. If the tap becomes progressively stiffer over time, mineral buildup is a likely suspect. Visual evidence of rust around the tap's base or handle points towards corrosion. Difficulty in achieving a complete shutoff, accompanied by dripping, suggests worn-out O-rings or washers. If the tap has been stiff since its installation, improper installation could be the issue.
Tools and Materials Required
Loosening a tight bathroom tap typically requires a selection of basic plumbing tools and materials. Gathering these items beforehand streamlines the repair process and helps prevent unnecessary delays. Essential tools include an adjustable wrench, a basin wrench (if working under the sink), a screwdriver set (Phillips head and flathead), penetrating oil or lubricant, white vinegar or a commercial descaling solution, pliers or slip-joint pliers, and a soft cloth or towels.
The adjustable wrench is used to loosen and tighten nuts and bolts within the tap assembly. The basin wrench, specially designed for working in tight spaces under the sink, is essential for disconnecting water supply lines. A screwdriver set allows for removing handles and other components to access the tap's internal parts. Penetrating oil, such as WD-40 or similar products, helps to loosen corroded or seized parts. White vinegar or a descaling solution effectively dissolves mineral buildup. Pliers or slip-joint pliers provide extra grip when needed. Finally, soft cloths or towels protect the surrounding surfaces from scratches and absorb any water spills.
Additionally, it is advisable to have replacement O-rings and washers on hand. Identifying the correct size and type of these components beforehand ensures a successful repair. A small container or tray is also helpful for organizing removed parts and preventing them from being lost.
Step-by-Step Guide to Loosening a Tap
Once the cause of the stiffness has been identified and the necessary tools and materials have been gathered, the following steps can be taken to loosen the bathroom tap:
1. Shut Off the Water Supply: The first and most important step is to shut off the water supply to the tap. Locate the shut-off valves under the sink, typically one for hot water and one for cold water. Turn both valves clockwise until they are completely closed. Verify that the water is indeed shut off by turning on the tap briefly. If water continues to flow, the shut-off valves may be malfunctioning and require replacement.
2. Protect the Sink: Before proceeding, protect the sink basin from scratches and damage by placing a soft cloth or towel over the area where you will be working. This is especially important if you are using metal tools that could accidentally slip and scratch the surface.
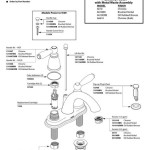
3. Remove the Tap Handle: The next step is to remove the tap handle to access the internal components. The method for removing the handle varies depending on the tap's design. Some handles have a small screw hidden beneath a decorative cap or button, while others are secured with a setscrew on the side. Locate the screw and use the appropriate screwdriver to remove it. Once the screw is removed, the handle should pull off easily. If the handle is stuck, gently rock it back and forth while pulling outward.
4. Disassemble the Tap: With the handle removed, carefully disassemble the tap to access the internal components. This typically involves unscrewing the tap's bonnet or valve cartridge. Use the adjustable wrench to loosen the bonnet, taking care not to damage the surrounding parts. Once the bonnet is loosened, it should unscrew by hand. Inside the tap, you will find the valve cartridge or stem, which controls the flow of water. Remove the cartridge or stem carefully, noting its orientation for reassembly.
5. Inspect and Clean the Components: Thoroughly inspect all the disassembled components for signs of mineral buildup, corrosion, or wear. Pay particular attention to the O-rings and washers, which are common culprits for stiffness. If mineral buildup is present, soak the components in white vinegar or a commercial descaling solution for several hours or overnight. Use a small brush or cloth to scrub away any remaining deposits. If corrosion is evident, use a wire brush or sandpaper to remove the rust. Replace any worn-out O-rings or washers with new ones of the correct size and type.
6. Lubricate the Components: After cleaning and inspecting the components, lubricate them with penetrating oil or a silicone-based grease. This will help to ensure smooth operation and prevent future stiffness. Apply the lubricant to the valve cartridge or stem, the O-rings, and any other moving parts. Be sure to use a lubricant that is safe for use with potable water systems.
7. Reassemble the Tap: Carefully reassemble the tap in the reverse order of disassembly. Ensure that all components are properly aligned and securely tightened. Avoid overtightening, which can damage the parts. Once the tap is reassembled, turn on the water supply gradually and check for leaks. If any leaks are present, tighten the connections as needed.
8. Test the Tap: After reassembling the tap and checking for leaks, test its operation to ensure that it is now easier to turn. Turn the tap on and off several times, observing the smoothness of the handle. If the tap is still stiff, repeat the cleaning and lubrication process or consider replacing the entire tap assembly.
Addressing Persistent Stiffness
In some cases, even after following the steps above, a bathroom tap may remain stubbornly stiff. This can indicate more complex problems, such as severe corrosion or irreparable damage to the tap's internal mechanisms. When simple cleaning and lubrication fail to resolve the issue, more advanced solutions may be necessary.
One option is to apply heat to the tap's seized components. Heat can help to loosen corroded parts by expanding the metal and breaking the bond between them. Use a heat gun or hairdryer to gently heat the affected areas, being careful not to overheat or damage any plastic or rubber components. After heating, apply penetrating oil and attempt to loosen the parts with a wrench.
Another approach is to use a specialized tap reseating tool. This tool is designed to resurface the valve seat, which is the area where the valve cartridge or stem makes contact with the tap body. Over time, the valve seat can become pitted or corroded, causing leaks and stiffness. The tap reseating tool will grind down the surface and create a smooth, flat sealing surface.
If all else fails, the most practical solution may be to replace the entire tap assembly. Replacing a tap is a relatively straightforward plumbing task that can be accomplished with basic tools and materials. A new tap will provide smooth, reliable operation and eliminate the frustration of a persistently stiff tap. When selecting a new tap, choose a high-quality model from a reputable manufacturer to ensure long-lasting performance.
Regular maintenance can prevent future stiffness. Periodically clean the tap with a descaling solution to remove mineral buildup. Lubricate the moving parts with silicone grease to keep them operating smoothly. Replace worn-out O-rings and washers promptly to prevent leaks and stiffness. These simple maintenance tasks will help to keep your bathroom taps functioning properly for years to come.

Fixing A Stiff Or Leaking Mixer Tap Cartridge Removal And Disassembly

How To Remove A Less Faucet Tap Without Vandal Proof Spanner

Faucet Handle Hard To Turn

How To Tighten Faucet Handle Homeserve Usa

How To Tighten Loose Mixer Taps Sink Basin Or Bath Ones

Single Lever Mono Basin Flow Cartridge Maintenance And Replacement

Tap Handle Removal Made Easy

How To Remove A Tap With No The Secret Tool

Learn The 7 Diy Steps To Replace Your Tap Washer Blog

Removing Stuck Handle From Faucet Mixer Tap Doityourself Com Community Forums
Related Posts