How To Fix A Leaky Grohe Bathroom Faucet Handle
A dripping Grohe bathroom faucet handle can be a persistent annoyance and a source of wasted water. Fortunately, most leaks stemming from the handle are often due to worn-out components that are relatively easy to replace. This guide will walk through the process of diagnosing and repairing a leaky Grohe bathroom faucet handle.
Safety First: Before beginning any repair, turn off the water supply to the faucet. This is typically done by locating the shut-off valves under the sink. Turn both the hot and cold water supply valves clockwise until they are completely closed. Turn on the faucet to confirm the water supply is off and relieve any remaining pressure.
Identifying the Leak Source: It’s crucial to pinpoint the origin of the leak. A leak originating from the handle area usually indicates a problem with the cartridge, O-rings, or handle screws. Observe when the leak occurs. Does it drip constantly, or only when the handle is turned on or off? This observation will assist in narrowing down the faulty component.
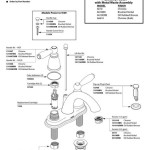
Gathering Necessary Tools: Having the correct tools on hand will streamline the repair process. Typically, you will need an Allen wrench (often included with Grohe faucets), a flathead screwdriver, pliers, and possibly a cartridge puller tool (depending on the faucet model). It’s also recommended to have replacement parts ready. These include a new cartridge, O-rings, and handle screws.
Removing the Handle: The method for removing the handle varies slightly depending on the Grohe faucet model. Many models utilize a small set screw located under a decorative cap on the handle. Use a small flathead screwdriver to pry off this cap, revealing the set screw. Use the appropriate size Allen wrench to loosen and remove the set screw. Once the set screw is removed, the handle can be pulled off.
Inspecting and Replacing the O-rings: Once the handle is removed, examine the O-rings located on the cartridge stem. These small rubber rings create a watertight seal. If they appear worn, cracked, or flattened, they need replacing. Carefully remove the old O-rings using a small flathead screwdriver or your fingernail. Lubricate the new O-rings with a silicone-based plumber's grease and install them onto the cartridge stem.
Removing and Replacing the Cartridge: If replacing the O-rings doesn’t resolve the leak, the cartridge itself likely needs replacing. The cartridge is the internal mechanism that controls the flow and temperature of the water. Depending on the Grohe faucet model, the cartridge might be held in place by a retaining clip or nut. If there’s a retaining clip, carefully use pliers to remove it. If there's a nut, use an adjustable wrench to loosen and remove it. Some cartridges require a cartridge puller tool for removal. Once the cartridge is free, install the new cartridge, ensuring it is correctly aligned and seated. Reinstall the retaining clip or nut.
Reassembling the Faucet: After replacing the cartridge and/or O-rings, reassemble the faucet in the reverse order of disassembly. Place the handle back onto the cartridge stem and secure it with the set screw. Don’t overtighten the set screw, as this can damage the handle. Replace the decorative cap.
Testing for Leaks: After reassembling the faucet, slowly turn the water supply back on. Check for leaks around the handle, base of the faucet, and under the sink. Turn the handle on and off several times to test for leaks during operation. If a leak persists, double-check that all components are properly seated and tightened.
Specific Grohe Model Variations: While the general steps outlined above apply to many Grohe faucets, some models may have slight variations. Consulting the specific installation manual for your Grohe faucet model will provide detailed instructions and diagrams specific to your faucet’s design. These manuals are often available online on the Grohe website or through authorized retailers.
Seeking Professional Assistance: If the leak continues after attempting these troubleshooting steps, it may be indicative of a more complex issue. In such cases, it's advisable to contact a qualified plumber experienced in repairing Grohe faucets. They have the expertise and specialized tools to diagnose and address more intricate plumbing problems, preventing further damage and ensuring a proper repair.
Maintaining Your Grohe Faucet: Regular maintenance can prevent future leaks and extend the lifespan of your Grohe faucet. Periodically inspect the faucet for any signs of wear or damage. Clean the aerator to remove mineral deposits that can restrict water flow. Avoid using abrasive cleaners that can scratch the faucet finish.

Grohe Faucet Handle Keeps Moving The Wrong Way

Grohe Faucet Handle Keeps Moving The Wrong Way

Grohe Leaky Faucet Repair

Fixing A Leaky Grohe Faucet

How To Fix A Dripping Grohe Faucet West London Living

How To Fix A Leaking Grohe Shower Valve

Grohe Faucet Handle Keeps Moving The Wrong Way

Grohe Tallinn 8 In Widespread 2 Handle Bathroom Faucet Brushed Nickel Infinityfinish 20583en0 The Home Depot

Start Basin Mixer 1 2 M Size Grohe

Grohe K7 Faucet Leaking Handle Installation