How To Fix Low Water Pressure In Bathroom
Low water pressure in a bathroom can be a frustrating problem, affecting showers, sinks, and toilets. Diagnosing the cause is the first step towards implementing an effective solution. This article outlines common causes of low water pressure in a bathroom and provides detailed instructions on how to troubleshoot and fix these issues.
Identifying the Scope of the Problem
Before attempting any repairs, it's crucial to determine whether the low water pressure is specific to the bathroom or a problem affecting the entire house. If other fixtures throughout the house have normal water pressure, the issue is likely isolated to the bathroom. If the entire house experiences low pressure, the problem lies within the main water supply or the water pressure regulator.
Start by checking other faucets and fixtures in the bathroom. Does the low pressure affect both hot and cold water, or just one? Low pressure in only one temperature could indicate a problem with the hot water heater or a blockage in the corresponding supply line. If both temperatures are affected, the problem is likely further upstream.
Also, consider the pattern of the low water pressure. Is it consistently low, or does it fluctuate? Fluctuating pressure might indicate a problem with the municipal water supply or a well pump issue. Consistent low pressure, especially when only affecting the bathroom, points towards localized causes like clogged aerators or faulty valves.
Common Causes and Solutions for Low Bathroom Water Pressure
Several factors can contribute to low water pressure specifically in a bathroom. Addressing these potential causes systematically can often resolve the issue.
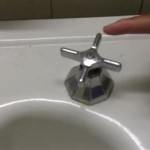
1. Clogged Aerators and Showerheads: The aerator, located at the tip of the faucet, and the showerhead can accumulate mineral deposits and debris over time, restricting water flow.
Solution: Remove the aerator by unscrewing it from the faucet. Inspect it for mineral buildup or debris. Clean the aerator by soaking it in vinegar for several hours, then scrubbing it with a brush. Rinse thoroughly with water before reattaching it. If the aerator is severely corroded or damaged, replace it. Similarly, remove the showerhead and inspect it for mineral buildup. Soak the showerhead in vinegar or use a commercial descaling solution. Use a small brush or pin to clear any blocked nozzles. Rinse thoroughly and reattach the showerhead.
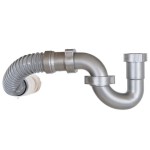
2. Kinked or Blocked Supply Lines: The flexible supply lines connecting the faucet and toilet to the main water pipes can become kinked, restricting water flow. Mineral deposits can also accumulate inside the lines, blocking the passage of water.
Solution: Inspect the supply lines under the sink and behind the toilet for any kinks or bends. Straighten any kinks to ensure unimpeded water flow. If the lines are old or corroded, consider replacing them. To check for blockages, turn off the water supply to the fixture. Disconnect the supply line and carefully inspect the inside for mineral buildup. If there's significant buildup, replace the supply line. You can also try flushing the supply line with water to dislodge any debris, but replacement is often the most effective solution.
3. Faulty Shut-Off Valves: The shut-off valves located under the sink and behind the toilet allow you to turn off the water supply for maintenance or repairs. These valves can sometimes fail internally, restricting water flow even when fully open.
Solution: Ensure that the shut-off valves are fully open. Turn the valve handle counterclockwise as far as it will go. If the valve is old or corroded, it may be partially blocked or the internal mechanism may be failing. To test the valve, turn off the main water supply to the house. Disconnect the supply line from the shut-off valve. Place a bucket under the valve and slowly open it. If the water flow is weak or nonexistent, the valve is likely faulty and needs to be replaced. Replacement involves disconnecting the old valve and installing a new one using a pipe wrench and thread sealant.
4. Issues with the Toilet Fill Valve: The fill valve inside the toilet tank controls the water flow into the tank after flushing. A malfunctioning fill valve can cause low water pressure in the toilet and potentially affect the water pressure in other bathroom fixtures.
Solution: Inspect the fill valve for any signs of damage or wear. Check the float, which controls the water level in the tank. Ensure that the float is moving freely and not obstructed. Clean the fill valve by flushing it with water or using a small brush to remove any debris. If the fill valve is old or damaged, replace it. Replacement involves disconnecting the water supply to the toilet, removing the old fill valve, and installing the new one according to the manufacturer's instructions.
5. Problems with the Mixing Valve in the Shower or Faucet: The mixing valve controls the blend of hot and cold water in the shower or faucet. Mineral deposits or internal damage to the mixing valve can restrict water flow and cause low pressure.
Solution: For a shower mixing valve, start by removing the handle and escutcheon (the decorative plate behind the handle). Inspect the valve cartridge for any signs of mineral buildup or damage. Soak the cartridge in vinegar or use a commercial descaling solution to remove mineral deposits. If the cartridge is severely damaged, replace it. To replace the cartridge, shut off the water supply to the shower. Remove the retaining clip or nut that holds the cartridge in place. Pull out the old cartridge and insert the new one, making sure it is properly aligned. Reinstall the retaining clip or nut and reattach the handle and escutcheon. For a faucet mixing valve, the procedure is similar. Consult the faucet manufacturer's instructions for specific details on how to remove and replace the cartridge.
6. Corroded or Leaking Pipes: Over time, pipes can corrode or develop leaks, reducing water pressure. This is more common in older homes with galvanized steel pipes.
Solution: Inspect visible pipes for signs of corrosion, leaks, or damage. Look for rust, discoloration, or water stains. If you suspect a leak, check for dampness or puddles of water near the pipes. Minor leaks can sometimes be repaired with pipe sealant or epoxy, but larger leaks or extensive corrosion may require pipe replacement. Replacing pipes is a more complex task that may require professional plumbing assistance.
Addressing Whole-House Water Pressure Issues
If the low water pressure affects the entire house, the problem is likely related to the main water supply or the water pressure regulator. These issues require different diagnostic and repair approaches.
1. Municipal Water Supply Issues: Problems with the municipal water supply can cause low water pressure throughout the neighborhood. This can be due to maintenance work, pipe breaks, or increased demand during peak hours.
Solution: Contact your local water utility company to inquire about any known issues in your area. They may be able to provide information about planned maintenance or repairs that are affecting water pressure. If the problem is due to increased demand, try to conserve water during peak hours (e.g., avoid watering the lawn during the evening). If the problem persists, the water utility company may need to investigate further.
2. Water Pressure Regulator Failure: The water pressure regulator is a device that reduces the water pressure from the main water supply to a safe and consistent level for your home. If the regulator fails, it can cause low water pressure throughout the house.
Solution: Locate the water pressure regulator, typically found near the main water shut-off valve. Inspect it for any signs of damage or leaks. To test the regulator, use a pressure gauge to measure the water pressure before and after the regulator. If the pressure is significantly lower after the regulator, it may be faulty and need to be adjusted or replaced. Some regulators have an adjustment screw that can be used to increase or decrease the water pressure. Consult the manufacturer's instructions for specific details on how to adjust the regulator. If the regulator is old or corroded, it may be best to replace it. Replacing the regulator requires shutting off the main water supply and disconnecting the old regulator. Install the new regulator according to the manufacturer's instructions, using thread sealant to ensure a watertight connection.
3. Well Pump Problems: If your home relies on a well for its water supply, low water pressure can be caused by problems with the well pump, such as a failing pump, a low water table, or a clogged well screen.
Solution: Check the well pump pressure switch to ensure it is functioning properly. The pressure switch controls the pump's on/off cycles based on the water pressure in the system. If the pressure switch is faulty, it may not be activating the pump properly. Consider having a well service professional inspect the well pump and well system for any problems. They can diagnose the cause of the low water pressure and recommend appropriate repairs or replacements. Common repairs include replacing the well pump, cleaning the well screen, or deepening the well.
Preventative Measures to Maintain Water Pressure
Regular maintenance can help prevent low water pressure problems in the bathroom and throughout the house.
1. Flush Water Heater Regularly: Sediment can accumulate in the bottom of the water heater over time, reducing its efficiency and potentially affecting water pressure. Flush the water heater at least once a year to remove sediment.
2. Inspect and Clean Aerators and Showerheads Regularly: Regularly clean aerators and showerheads to prevent mineral buildup and maintain good water flow.
3. Replace Old or Corroded Pipes: If your home has old galvanized steel pipes, consider replacing them with copper or PEX pipes to prevent corrosion and improve water pressure.
4. Monitor Water Pressure Regularly: Use a pressure gauge to monitor your home's water pressure regularly. This can help you identify potential problems early on.
Addressing low water pressure in a bathroom requires a systematic approach to identify the cause and implement the appropriate solution. By following the steps outlined in this article, homeowners can troubleshoot and resolve many common low water pressure issues and maintain a healthy water system.

How To Increase Water Pressure In Your Shower Expert Advice Anchor Pumps

How To Improve Low Water Pressure At Home 2024 Guide Forbes

Solved Reasons You Have Low Water Pressure In The Shower Best Home Services

How To Increase Water Pressure In Your Shower By Mira Showers

How To Fix Low Water Pressure Conditioned Air Systems

How To Fix Low Water Pressure In Faucet

How To Fix Low Water Pressure In A Bathroom Sink Worst Room

What Causes Low Water Pressure In The Shower Benjamin Franklin Plumbing Inc

How To Increase Low Water Flow Rate In Shower Bath

Low Water Pressure In Bathroom Sink 4 Reasons And 8 Fixes Bargain
Related Posts