How to Install a Moen 3-Piece Bathroom Faucet
Installing a Moen 3-piece bathroom faucet is a relatively straightforward process that can be accomplished with basic plumbing skills. This type of faucet typically consists of three components: the spout, the handle(s), and the base. By following the correct steps and utilizing the appropriate tools, homeowners can successfully replace or install a Moen 3-piece bathroom faucet.
Step 1: Gather Tools and Materials
Before beginning the installation, gather the necessary tools and materials. These typically include:
- Adjustable wrench
- Channel-lock pliers
- Phillips screwdriver
- Plumber's tape
- Pipe thread sealant
- Level
- New Moen 3-piece bathroom faucet
- Optional: Basin wrench
It is important to ensure the new faucet is compatible with the existing plumbing before starting the installation. Refer to the manufacturer's instructions or consult a plumbing professional if you have any doubts. Once the tools and materials are gathered, you can proceed to step 2.
Step 2: Shut Off Water Supply and Drain Existing Faucet
To prevent water damage and ensure a safe working environment, shut off the water supply to the bathroom sink. Locate the shut-off valves for the hot and cold water lines and turn them clockwise until they are fully closed. It is advisable to check for leaks and ensure the water is completely shut off before proceeding further.
Next, drain the existing bathroom faucet. This can be done by opening the faucet handles completely and allowing the water to drain into the sink. Once the water has drained, use a basin wrench or adjustable wrench to loosen and remove the existing faucet's mounting nuts. Carefully detach the old faucet from the sink and set it aside.
Step 3: Prepare for the New Faucet Installation
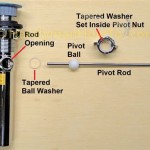
Before attaching the new faucet, inspect the sink's mounting holes and the faucet's base. Ensure the holes are clean and free of debris, as any obstructions can impede installation. It is also essential to check for any damage or wear and tear on the sink's mounting threads. If necessary, use a pipe thread sealant tape to ensure a secure and leak-proof connection. This sealant creates a barrier that prevents leaks by sealing the threads around the faucet’s base.
The mounting threads on the faucet base should be lubricated with pipe thread sealant tape. This helps ensure a tight and secure connection between the base and the sink. It is important to apply the tape in the correct direction, winding it clockwise from the end of the thread, and avoid overlapping the tape.
Position the base of the new faucet on the sink's mounting holes, ensuring it sits flush and level. Use a level to check for any unevenness and adjust the base accordingly. Once the base is positioned correctly, use the mounting nuts to secure it to the sink.
Step 4: Install the Spout and Handles
With the base securely fastened to the sink, attach the spout. Most Moen 3-piece faucets feature a threaded spout, which screws into the base. Tighten the spout using an adjustable wrench or channel-lock pliers. Avoid overtightening as it can damage the threads or the spout. Make sure the spout is aligned with the sink properly.
Finally, attach the handles to the base of the faucet. Some faucets may have a separate stem that needs to be installed in each handle before attaching it. Refer to the manufacturer's instructions for specific installation details. Once the handles are attached, check for proper alignment and functionality.
Step 5: Test and Secure
After installing the entire faucet, turn the water supply back on. Start by gradually opening the shut-off valves for both the hot and cold water lines. Listen for any leaks and check the faucet for any loose parts or misalignment. If everything is functioning properly, secure the faucet using the appropriate tools and tighten all connections. This ensures a leakproof installation and prevents any future problems.
Once the installation is complete, check for any leaks or issues. If everything is working correctly, enjoy your new Moen 3-piece bathroom faucet.

How To Install Moen 3 Pc Lav Faucet

How To Install A Bathroom Faucet Moen Adler

How To Install Moen 3 Pc Lav Faucet

How To Install Bathroom Faucet And Drain Moen Adler Collection

Bathroom Vanity Moen 8 Inch Widespread Faucet

Installing A New Moen Liso 84540srn Bathroom Faucet

How To Install A Moen Centerset Faucet

How To Install Moen Widespread Bathroom Faucets

Moen Eva 8 In Widespread 2 Handle Bathroom Faucet Trim Kit Brushed Nickel Valve Included T6420bn 9000 The Home Depot

Moen Widespread Bathroom Faucet Rough In Valve With Drain Assembly 1 2 Ips Connection 9000 The Home Depot
Related Posts