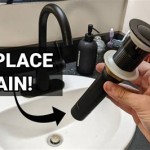
How To Install A Small Bathroom Sink Plug
A properly functioning sink plug is essential for everyday bathroom tasks. Whether replacing a worn-out plug or installing one in a new sink, understanding the process ensures a leak-free and efficient sink. This guide provides a comprehensive overview of installing a small bathroom sink plug, covering various types and installation methods.
Sink plugs broadly fall into two main categories: pop-up plugs and push-fit plugs. Pop-up plugs operate via a lever located behind the faucet, which raises and lowers a stopper. Push-fit plugs, also known as grid strainer plugs, are simply pressed into the drain opening to close and pulled out to open. Choosing the correct replacement depends on the existing drain assembly.
Before beginning the installation, it’s essential to gather the necessary tools. These typically include an adjustable wrench, pliers, plumber's putty, a small bucket, and possibly a screwdriver depending on the plug type. It's also advisable to have a clean cloth or rag handy.
The first step in installing a pop-up plug involves removing the old assembly. This begins by disconnecting the pivot rod from the drain flange. The pivot rod is the vertical rod connected to the lever behind the faucet. This connection often involves a clip or screw that needs to be detached. Next, loosen and remove the nut securing the drain flange to the sink from underneath the sink basin. The entire drain assembly can then be removed.
Once the old assembly is removed, clean the sink surface around the drain opening to ensure a proper seal for the new flange. A layer of plumber's putty is then applied around the underside of the new drain flange. The flange is inserted into the drain opening from above and pressed down firmly. Underneath the sink, tighten the nut onto the drain flange, securing it to the sink. Avoid overtightening, which can crack the sink.
With the drain flange secured, the pop-up assembly can be inserted into the drain. The pivot rod is then connected to the pop-up assembly and adjusted to the correct length. This adjustment usually involves a clevis screw that allows for fine-tuning the plug's vertical movement. Once the pivot rod is connected, test the operation of the plug by moving the lever behind the faucet.
Installing a push-fit plug is a simpler process. Begin by cleaning the drain opening and removing any old sealant residue. It's crucial that the drain opening is clean and dry. The push-fit plug typically has a rubber seal around its perimeter. This seal is pressed firmly into the drain opening until it's flush with the sink surface. No additional tools or sealants are usually required.
Maintaining a properly sealed drain is critical to prevent leaks. Regularly inspect the area around the drain flange and the pop-up assembly (if applicable) for any signs of leakage. If a leak is detected, tighten the nut securing the drain flange. If the leak persists, the plumber's putty might need to be replaced.
For push-fit plugs, ensure the rubber seal is clean and free from debris. If the seal is damaged or worn, replace the entire plug assembly. Regular cleaning of the drain, regardless of the plug type, prevents clogs and ensures efficient drainage.
While these instructions cover the most common scenarios, some variations might exist depending on the specific sink and plug design. Always consult the manufacturer's instructions provided with your new sink plug. These instructions provide specific details for your chosen model and may include extra steps not covered in this general guide. Proper installation ensures a leak-free drain and extends the life of the sink plug.
Proper installation and maintenance contribute significantly to the longevity and efficient operation of your sink. By understanding the different plug types and following these guidelines, one can successfully install a small bathroom sink plug and ensure trouble-free operation for years to come.
If any uncertainty arises during the installation process, consulting a qualified plumber is recommended. A professional plumber can address specific challenges, ensuring a correct and leak-free installation.

How To Replace A Sink Stopper Quick And Simple Home Repair

How To Replace A Sink Stopper Quick And Simple Home Repair

Step By Guide On How To Install Sink Pop Up Drain Stopper
:max_bytes(150000):strip_icc()/bathroom-sink-drain-installation-2718843-01-4955fe1f576b447a91abe51c126d220b.jpg?strip=all)
How To Install A Pop Up Bathroom Sink Drain Stopper

How To Replace A Rusty Sink Drain Howtolou Com

How To Replace A Bathroom Sink Stopper Pop Up Style Tutorial

Basin Wastes Guide Everything You Need To Know

Fix A Sink Stopper 15 Steps With Pictures Instructables
How To Get A Bathroom Sink Plug Removed When It Won T Un Quora

How To Remove A Sink Stopper The Home Depot


