How To Install A Small Bathroom Sink
Installing a small bathroom sink can be a manageable DIY project with the right tools and a careful approach. This guide provides a step-by-step process for installing a new sink, covering everything from preparing the space to connecting the plumbing.
Preparing for Installation
Proper preparation is crucial for a successful installation. This involves gathering the necessary tools and materials and preparing the bathroom space. A cluttered workspace can hinder the process and potentially lead to damage.
- Gather Tools and Materials: Assemble all necessary tools, including adjustable wrenches, pliers, a basin wrench, plumber's putty, Teflon tape, a caulk gun, and safety glasses. Ensure the new sink, faucet, drain assembly, and supply lines are readily available.
- Turn Off Water Supply: Locate the shut-off valves under the sink and turn them clockwise to stop the water flow. Turn on the faucet to release any remaining water pressure in the lines.
- Clear the Area: Remove any items stored under the sink to create ample working space. Place towels or a drop cloth on the floor to protect the surface from scratches or dropped tools.
Removing the Old Sink
With the area prepared, the next step is carefully removing the existing sink. This involves disconnecting the plumbing and detaching the sink from the countertop or vanity.
- Disconnect Supply Lines: Use an adjustable wrench to disconnect the hot and cold water supply lines from the shut-off valves. Have a bucket handy to catch any remaining water in the lines.
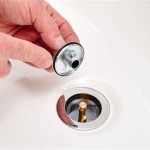
- Disconnect P-Trap: Place a bucket under the P-trap to collect water. Loosen the slip nuts connecting the P-trap to the drainpipe and the sink drain tailpiece. Remove the P-trap.
- Detach Sink from Countertop: Depending on the sink type, it may be secured with clips, screws, or adhesive caulk. Carefully remove these fasteners to detach the sink. If the sink is caulked, a putty knife might be necessary to break the seal.
- Lift Out Old Sink: Once disconnected, lift the old sink out of the vanity and dispose of it properly.
Installing the New Sink
With the old sink removed, the focus shifts to installing the new sink. This involves installing the faucet and drain assembly, positioning the sink, and securing it to the countertop.
- Install Faucet and Drain Assembly: Follow the manufacturer's instructions to install the faucet and drain assembly onto the new sink. This typically involves attaching the faucet, handles, and drain flange from above and tightening the nuts from below.
- Apply Plumber's Putty: Create a rope of plumber's putty and place it around the underside of the drain flange. This creates a watertight seal between the drain and the sink.
- Position the Sink: Carefully lower the new sink into the opening in the countertop, ensuring the drain aligns with the drainpipe.
- Secure the Sink: Depending on the sink type, secure it to the countertop using mounting clips, screws, or adhesive. Follow the manufacturer’s instructions for proper installation.
Connecting the Plumbing
After securing the sink, the next step is connecting the plumbing, including the supply lines and drain. This involves attaching new supply lines and reassembling the P-trap.
- Connect Supply Lines: Attach new supply lines to the shut-off valves and the faucet tailpieces. Use Teflon tape on the threads to create a watertight seal. Tighten the connections with an adjustable wrench but avoid overtightening.
- Reassemble P-Trap: Reconnect the P-trap to the drainpipe and the sink drain tailpiece. Tighten the slip nuts by hand, then give them a quarter turn with pliers.
- Apply Caulk: Apply a bead of silicone caulk around the edge of the sink where it meets the countertop. This provides a finished look and prevents water from seeping underneath.
Testing for Leaks
The final step is to test for leaks. This is crucial to ensure the installation is successful and prevent water damage.
- Turn on Water Supply: Slowly turn on the shut-off valves and check for leaks around the supply lines and the P-trap connections. Tighten any connections as needed.
- Check Drain Function: Run water in the sink and observe the drain for proper drainage and leaks. If leaks are detected, address them accordingly.
- Inspect Caulk Seal: Ensure the caulk seal is intact and watertight. Wipe away any excess caulk with a damp cloth for a clean finish.

How To Install A Bathroom Vanity

How To Install A Wall Mount Sink And Plumb It Too

How To Install A Floating Sink In Bathroom As Beginner Home Renovation

How To Install A Bathroom Vanity

How To Install A Pedestal Sink The Home Depot
:strip_icc()/102130240-57841f265ac34fed91936f22e7dd9edb.jpg?strip=all "How To Install A Bathroom Vanity Sink In Few Hours")
How To Install A Bathroom Vanity Sink In Few Hours

How To Install A Pedestal Sink Elevate Your Bathroom

How To Install A Pedestal Sink Victoriaplum Com

How To Install Bathroom Vanity Units That Make Your Friends Jealous

How To Install A Vanity Forbes Home
Related Posts