How to Install A Two-Handle Delta Bathroom Faucet
Replacing a bathroom faucet is a common plumbing task that many homeowners can accomplish with the right tools and a clear understanding of the steps involved. This article provides a comprehensive guide on how to install a two-handle Delta bathroom faucet, a popular and reliable choice for upgrading your bathroom fixtures. Following these instructions carefully will ensure a successful installation and a leak-free connection.
Before beginning any plumbing project, it is crucial to prioritize safety and preparation. This includes gathering the necessary tools, understanding the existing plumbing configuration, and taking precautions to prevent water damage. Skipping these preparatory steps can lead to complications and potential damage to your home.
Preparation and Safety Precautions
Prior to commencing the installation process, gather the following tools and materials: a new two-handle Delta bathroom faucet, adjustable wrenches (two), plumbers putty, a basin wrench (faucet wrench), a screwdriver (Phillips and flathead), a bucket, towels or rags, safety glasses, and potentially penetrating oil or rust remover. Having all the necessary equipment readily available will streamline the process and minimize interruptions.
The first and most important safety step is to shut off the water supply to the existing faucet. Locate the shut-off valves under the sink. These are typically small, oval-shaped valves with a handle. Turn these handles clockwise until they are completely closed. If the shut-off valves are corroded or do not function properly, it may be necessary to shut off the main water supply to the house. This is typically located in the basement, garage, or near the water meter. Once the water is shut off, turn on the existing faucet to relieve any remaining pressure in the pipes. Place a bucket under the sink to catch any residual water.
Protecting your eyes from debris is another critical safety measure. Wear safety glasses throughout the entire process. Corrosion and sediment can dislodge during the removal and installation process, posing a potential hazard to your vision. Additionally, keep the work area well-ventilated to avoid inhaling any fumes from cleaning agents or plumbing compounds.
Inspect the drain assembly. Determine if you will be replacing the drain, or if you will be re-using the existing drain. If you plan to replace the drain, ensure that the drain assembly included in your faucet kit is compatible with your sink. If the existing drain looks to be in good condition, you can choose to omit the drain assembly step. Be certain that the new faucet will line up with the existing configuration to prevent complications.
Proper preparation is the key to a smooth and successful faucet installation. Taking the time to gather the necessary tools and materials, shut off the water supply, and protect yourself from injury will save time and prevent frustration in the long run.
Removing the Old Faucet
With the water supply shut off and the necessary tools at hand, the next step is to remove the existing faucet. This can often be the most challenging part of the process, especially if the old faucet is corroded or has been in place for a long time. Patience and the appropriate tools are essential for a successful removal.
Begin by disconnecting the water supply lines from the old faucet. Use adjustable wrenches to loosen the connections between the supply lines and the faucet tailpieces. Have a bucket and towels ready to catch any water that may be trapped in the lines. If the connections are heavily corroded, penetrating oil or rust remover may be necessary to loosen them. Allow the penetrating oil to sit for several minutes before attempting to loosen the connections again.
Once the water supply lines are disconnected, focus on the hardware that secures the faucet to the sink. This typically consists of nuts or mounting brackets located underneath the sink. Access to these fasteners can be limited, so a basin wrench is often the most effective tool for this task. A basin wrench is a specialized wrench with a long handle and a pivoting jaw that allows you to reach and grip nuts in tight spaces. Position the jaw of the basin wrench on the nut and turn the wrench counterclockwise to loosen it. Repeat this process for all of the mounting hardware.
After all the mounting hardware has been removed, carefully lift the old faucet from the sink. Be mindful of any remaining water or debris that may be present. Once the faucet is removed, thoroughly clean the sink surface around the mounting holes. Remove any old plumbers putty or sealant residue using a scraper or putty knife. A clean surface is essential for creating a watertight seal with the new faucet.
If you are replacing the drain assembly, now is the time to remove the old drain. Loosen the nut that connects the drain tailpiece to the P-trap. Once the nut is loosened, carefully remove the drain tailpiece and the drain body from the sink. Clean the drain opening thoroughly to remove any debris or old sealant.
Disposing of the old faucet and drain assembly responsibly is important. Check with your local waste management authority for information on proper disposal methods for plumbing fixtures.
Installing the New Delta Faucet
With the old faucet removed and the sink surface cleaned, the final step is to install the new two-handle Delta bathroom faucet. This involves connecting the faucet handles, installing the faucet body, connecting the water supply lines, and ensuring a watertight seal. Following the manufacturer's instructions carefully is crucial for a successful installation.
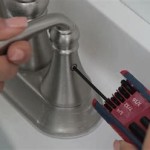
Begin by assembling the faucet handles according to the manufacturer's instructions. This typically involves attaching the handles to the faucet stems using screws or other fasteners. Ensure that the handles are securely attached and that they operate smoothly. Some Delta faucets may require you to install the hoses to both the left and right faucet connections. Be certain to tighten properly but avoid over-tightening to prevent damage to the fixtures.
Next, install the faucet body onto the sink. Apply a bead of plumbers putty around the base of the faucet body where it will contact the sink surface. This will create a watertight seal and prevent leaks. Carefully position the faucet body over the mounting holes in the sink and press it firmly into place. From underneath the sink, attach the mounting hardware that secures the faucet body to the sink. This typically consists of nuts or brackets that are tightened with a wrench. Tighten the mounting hardware evenly to ensure that the faucet body is securely attached and that the plumbers putty is properly compressed.
Connect the water supply lines to the faucet tailpieces. Use adjustable wrenches to tighten the connections. Be careful not to overtighten the connections, as this can damage the tailpieces or the supply lines. Ensure that the connections are snug and watertight. If necessary, use Teflon tape on the threads of the connections to create a better seal.
If you are installing a new drain assembly, insert the drain body into the sink drain opening. Apply a bead of plumbers putty around the underside of the drain flange to create a watertight seal. From underneath the sink, attach the drain tailpiece to the drain body and tighten the nut that secures the connection. Connect the drain tailpiece to the P-trap.
Once the installation is complete, turn on the water supply to the faucet. Check all connections for leaks. If you find any leaks, tighten the connections slightly until the leaks stop. If the leaks persist, disassemble the connections and inspect the threads for damage. Reapply Teflon tape or plumbers putty as needed and reassemble the connections.
After verifying that there are no leaks, operate the faucet handles to ensure that they function properly. Check the water flow and temperature. Ensure that the drain operates smoothly and that there are no leaks in the drain assembly.
Thoroughly clean the sink and surrounding area. Remove any plumbers putty residue or other debris. Discard any used materials responsibly.
The installation of a two-handle Delta bathroom faucet is a straightforward process that can be accomplished by most homeowners with the right tools and a clear understanding of the steps involved. By following these instructions carefully and taking the necessary safety precautions, you can successfully upgrade your bathroom fixtures and enjoy a leak-free connection for years to come.

How To Replace A Two Handle Faucet Delta Blog

How To Fix Leaky Bathroom Handle Delta Faucet Model 4530 Series Hard Water

How To Install A Bathroom Faucet By Delta

Two Handle Widespread Bathroom Faucet In Champagne Broe 35840lf Cz Delta

Delta Windemere 8 In Widespread 2 Handle Bathroom Faucet With Metal Drain Assembly Chrome B3596lf The Home Depot

Delta Trinsic 8 In Widespread 2 Handle Bathroom Faucet With Metal Drain Assembly Chrome 3559 Mpu Dst The Home Depot

Two Handle Mini Widespread Bathroom Faucet 4530 Lhp H212 Delta

Delta Foundations Two Handle Centerset Bathroom Faucet In Chrome B2510lf Com

P299196lf Two Handle Bathroom Faucet

Delta Two Handle Widespread Bathroom Faucets User Manual
Related Posts


