How to Install a Moen Bathroom Sink Drain
Installing a Moen bathroom sink drain is a common plumbing task that homeowners can often accomplish themselves with the proper tools and a clear understanding of the necessary steps. This article provides a detailed guide on how to install a Moen bathroom sink drain, focusing on clarity and accuracy to ensure a successful installation.
Before commencing the installation, it is crucial to gather all the required tools and materials. Working with the correct equipment will streamline the process and help prevent potential issues. The following is a list of essential items:
*New Moen bathroom sink drain assembly (verify compatibility with your sink type)
*Basin wrench (also known as a sink wrench)
*Channel-lock pliers
*Adjustable wrench
*Putty knife or scraper
*Plumber's putty
*Teflon tape (plumber’s tape)
*Clean cloth or rag
*Bucket or container to catch water
*Safety glasses
*Gloves (optional)
Preparing the work area is an important initial step for any plumbing project. Ensuring a clean and accessible workspace will contribute to a smoother and more efficient installation. The first step is to turn off the water supply to the faucet. Locate the shut-off valves under the sink, typically two valves—one for hot water and one for cold water. Turn both valves clockwise until they are completely closed. Verify that the water is shut off by turning on the faucet; only residual water should come out.
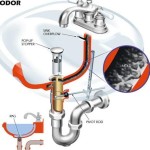
Place a bucket or container under the existing drain assembly to catch any remaining water. Disconnect the P-trap, which is the curved pipe located under the sink. Loosen the slip nuts connecting the P-trap to the drain tailpiece and the drainpipe using channel-lock pliers. Be prepared for residual water to spill out when the P-trap is removed. Use the clean cloth or rag to wipe up any spills. Dispose of the old P-trap if it is damaged or corroded; otherwise, set it aside for reinstallation later. If you plan to reuse the P-trap, it's a good idea to clean it out.
Removing the Existing Drain
Removing the old drain is a crucial step that must be performed carefully to avoid damaging the sink or surrounding plumbing. Start by using a putty knife or scraper to carefully remove any old plumber's putty around the drain flange, which is the top part of the drain fitting that sits inside the sink basin. The putty may be hardened, so apply gentle pressure and work around the flange to loosen it.
Depending on the type of drain, there will be a nut holding the drain body to the sink from underneath. This nut can be quite tight and difficult to remove, especially if it has corroded over time. Use a basin wrench to loosen and remove the nut. A basin wrench is designed specifically for this task, with a swiveling head that allows it to reach into tight spaces under the sink. Once the nut is loosened, you should be able to unscrew it by hand. Continue unscrewing the nut until it is completely removed.
With the nut and any other fittings removed, gently push the drain body upward from below the sink. The old drain flange should now be loose and can be lifted out of the sink basin. Clean the sink opening thoroughly with a cloth to remove any remaining plumber's putty or debris. Ensure the surface is clean and dry before installing the new drain.
Inspect the sink opening for any damage or irregularities. If there are any chips or cracks, they should be addressed before installing the new drain to prevent leaks. Small chips can sometimes be filled with epoxy, but larger cracks may require professional repair or sink replacement. Once the sink opening is clean and in good condition, you are ready to proceed with installing the new Moen drain assembly.
Assembling and Installing the New Moen Drain
The installation of the new Moen drain requires careful attention to detail to ensure a watertight seal. The Moen drain assembly typically consists of several components, including the drain flange, rubber or plastic washers, a friction washer, a cardboard washer, and a mounting nut. Before starting, consult the manufacturer's instructions for specific guidance on the assembly order for your particular Moen drain model. However, the following steps generally apply:
Begin by applying a generous amount of plumber's putty to the underside of the drain flange. Roll the putty into a rope-like shape and press it firmly around the underside of the flange, ensuring that the entire surface that will contact the sink is covered. This putty will create a watertight seal between the flange and the sink.
Insert the drain flange into the sink opening from above. Press down firmly on the flange to seat it properly and to squeeze out any excess putty. Remove any excess putty from around the edge of the flange using a putty knife or clean cloth, creating a clean and neat seal.
From underneath the sink, slide the rubber or plastic washer, friction washer, and cardboard washer (in that order) onto the drain tailpiece, followed by the mounting nut. Tighten the nut onto the drain tailpiece by hand until it is snug. Then, use an adjustable wrench to tighten the nut further. Be careful not to overtighten the nut, as this could damage the sink or the drain assembly. The goal is to create a tight seal without cracking the materials.
Ensure that the drain tailpiece is properly aligned with the drainpipe. The drain tailpiece is the vertical pipe that extends downward from the drain assembly. It should be aligned so that it connects smoothly with the P-trap. If necessary, adjust the position of the drain assembly to achieve proper alignment.
Connecting the P-Trap and Testing for Leaks
After the drain assembly is securely in place, the final step is to reconnect the P-trap and test for leaks. The P-trap prevents sewer gases from entering the bathroom through the drain. Begin by aligning the P-trap with the drain tailpiece and the drainpipe. Ensure that the slip nuts are in the correct position for tightening.
Slide the slip nuts onto the connections between the P-trap, the drain tailpiece, and the drainpipe. Tighten the slip nuts by hand until they are snug. Then, use channel-lock pliers to tighten the nuts further. As with the mounting nut on the drain assembly, be careful not to overtighten the slip nuts, as this could damage the pipes or the nuts themselves. The goal is to create a tight seal without cracking the materials.
Once the P-trap is reconnected, turn the water supply back on by slowly opening the shut-off valves under the sink. Check all connections for leaks. Pay close attention to the drain flange, the mounting nut, and the slip nuts on the P-trap. If you see any leaks, immediately turn off the water supply and tighten the connections further. If the leak persists, you may need to disassemble the connection and inspect the components for damage or misalignment. You may also need to reapply plumber's putty or Teflon tape to ensure a proper seal.
After verifying that there are no leaks, run water into the sink for several minutes to ensure that the drain is functioning properly. Check for any slow drainage or unusual noises. A correctly installed drain should allow water to flow freely without any leaks or obstructions. If you encounter any issues, consult a professional plumber for assistance. The use of Teflon tape on the drain tailpiece threads can further enhance the seal and prevent future leaks. Wrap the Teflon tape clockwise around the threads before connecting the nuts.
The proper installation of a Moen bathroom sink drain is a detailed process involving careful preparation, meticulous assembly, and thorough testing. By following these instructions and taking the time to ensure each step is completed correctly, homeowners can successfully install a new drain and ensure a properly functioning plumbing system.

Bathroom Faucet Drains 50 96497 Moen Solutions

Install Moen Bathroom Sink Faucet And Drain

Install Moen Bathroom Sink Faucet And Drain

Install Moen Bathroom Sink Faucet And Drain

Moen Lavatory Drain Assembly 96497 The Home Depot

How To Install Bathroom Faucet And Drain Moen Adler Collection

Moen Lindor Bathroom Sink Snappy Trap Drain Complete Install Diy How Howto

Moen Widespread Bathroom Faucet Rough In Valve With Drain Assembly 1 2 Ips Connection 9000 The Home Depot

How To Install A Moen Centerset Faucet

Diy How To Install The Moen Boardwalk Faucet Redhead Mom
Related Posts


