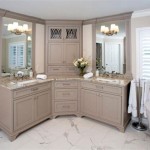
How To Make A Bathroom Vanity From a Dresser
Repurposing a dresser into a bathroom vanity offers a cost-effective way to achieve a unique and stylish look. This project allows for customization and the incorporation of vintage or antique pieces into a modern bathroom design. Careful planning and execution are crucial for a successful transformation.
The initial step involves selecting a suitable dresser. Solid wood dressers are preferred due to their durability and resistance to moisture. The dresser's dimensions should be appropriate for the bathroom space, providing adequate counter space and storage while allowing for comfortable movement within the room. Existing damage should be assessed and repaired before proceeding.
Thorough cleaning of the dresser is essential before any modifications are made. Remove all hardware, including drawers and handles. A mild detergent solution can be used to clean the dresser's surfaces, followed by rinsing and drying. This ensures a clean surface for painting or staining.
Depending on the desired aesthetic, the dresser may require sanding. If the existing finish is in good condition and compatible with the intended new finish, light sanding may suffice to create a surface for adhesion. If the dresser has a thick or damaged finish, more extensive sanding may be necessary to remove it completely.
Protecting the dresser from moisture is crucial for its longevity in a bathroom environment. Several coats of primer designed for water resistance should be applied to all surfaces of the dresser. This provides a barrier against humidity and prevents the wood from absorbing moisture, which can lead to warping and damage. Allow sufficient drying time between coats according to the primer manufacturer's instructions.
Once the primer has dried completely, the dresser can be painted or stained according to personal preference. Several thin coats of paint or stain should be applied, allowing adequate drying time between each coat. For a more durable finish, a sealant can be applied after the paint or stain has dried. This additional layer provides further protection against moisture and wear.
The next stage involves preparing the dresser for the sink and plumbing. The top of the dresser may need to be modified to accommodate the sink. This could involve cutting an opening for a drop-in sink or removing the top entirely for an undermount sink. Accurate measurements are crucial for proper sink installation.
Plumbing modifications are often necessary to connect the vanity to the existing bathroom plumbing. This may involve adjusting the height of the water supply lines and drainpipe. A professional plumber should be consulted if significant plumbing alterations are required to ensure compliance with building codes and prevent leaks.
The type of sink chosen dictates the installation process. Drop-in sinks are placed into a pre-cut opening in the dresser top, while undermount sinks are attached to the underside of the countertop. Follow the manufacturer's instructions for the specific sink being installed. Silicone caulk should be used to seal the edges of the sink to prevent water leakage.
The faucet and drain assembly should be installed according to the manufacturer's instructions. Ensure all connections are tight and secure to prevent leaks. After installation, test the plumbing thoroughly for proper function and check for any leaks.
Once the plumbing is complete, the drawers can be reinstalled. Depending on the sink configuration, modifications to the top drawers may be necessary to accommodate the plumbing underneath. This might involve cutting notches or reducing the drawer depth. Hardware can be reattached or replaced with new hardware that complements the vanity's design.
The final step involves installing the countertop. If the original dresser top was removed, a new countertop material, such as marble, granite, or laminate, can be installed. The countertop should be securely attached to the dresser frame. Ensure proper sealing around the edges to prevent water damage.
Choosing the right countertop material depends on budget and desired aesthetics. Marble and granite offer a luxurious look but are more expensive than laminate. Laminate countertops provide a cost-effective and durable option with a variety of colors and patterns available.
After the countertop installation, attach the backsplash, if desired. A backsplash protects the wall behind the vanity from water damage and adds a finished look. Tile, stone, or laminate can be used for the backsplash, complementing the countertop material.

A Pro Renovator S 6 Tips For Turning Dresser Into Bathroom Vanity

How To Make A Dresser Into Vanity Tutorial An Oregon Cottage

Turn A Vintage Dresser Into Bathroom Vanity

Repurposed Dresser Converted To Bathroom Vanity Reinvented Delaware

Mid Century Dresser Into Vanity Bright Green Door
/103058794-9279662b921c41259cb908f3cb19acd9.jpg?strip=all)
How To Turn An Old Dresser Into A Beautiful Bathroom Vanity

Stunning Bathroom Tour Dresser Into Double Vanity

Repurposed Dresser Converted To Bathroom Vanity Reinvented Delaware

Repurposed Dresser Converted To Bathroom Vanity Diy Antique

How To Convert A Dresser Into Bathroom Vanity The Little By Home
Related Posts


