How to Make a Corner Bathroom Vanity
A corner bathroom vanity is an excellent way to maximize space in a smaller bathroom. It offers a unique design element while providing ample storage for toiletries and other essentials. Creating a custom corner vanity allows you to tailor it to your specific needs and style preferences. This guide will provide you with a step-by-step process on how to make a corner bathroom vanity, outlining essential tools, materials, and techniques.
1. Planning and Design
Before embarking on construction, meticulous planning is crucial. Firstly, carefully measure the available space in your corner bathroom. This will determine the dimensions of your vanity, ensuring it fits comfortably without obstructing movement. Consider the desired height, width, and depth of your vanity based on your preferences and the specific requirements of your bathroom.
Next, sketch out a detailed design plan for your corner vanity. This plan should include all the necessary components, such as shelves, drawers, doors, and the countertop. Determine the materials you plan to use, which could include wood, laminate, or even a combination of both. Visualize the overall style and aesthetic you want to achieve, considering factors like the existing bathroom decor and your personal taste.
When designing your vanity, think about the functionality you need. Decide on the number of shelves and drawers, their size and accessibility. If you plan on incorporating plumbing fixtures, ensure you have a clear picture of their location and connections. This detailed design process will make the construction phase more efficient and prevent mistakes.
2. Gathering Materials and Tools
Once you've finalized your design, it's time to gather the necessary materials and tools. Here's a comprehensive list:
Materials: * Wood (plywood, MDF, or solid wood) for the vanity frame, shelves, and drawers * Countertop material (granite, marble, laminate, or solid surface) * Cabinet hardware (hinges, drawer slides, knobs, and pulls) * Wood glue * Screws and nails * Primer and paint (optional, depending on your finish) * Waterproof sealant * Sink and faucet (optional, if incorporating a sink)
Tools: * Tape measure * Level * Pencil * Circular saw * Jigsaw * Drill * Screwdriver * Sander * Clamps * Safety glasses * Respirator * Work gloves
Ensure you have all the necessary materials and tools on hand before beginning construction to avoid delays. Ensure you have adequate space for your project and a well-ventilated area for working with wood and paint.
3. Building the Vanity Frame
The vanity frame is the base of your corner vanity, supporting all other components. It's crucial to build a sturdy and well-assembled frame for long-term stability. Start by cutting the wood pieces to the correct dimensions according to your design plan.
Use a circular saw to cut the wood precisely, and a jigsaw for any curved or intricate cuts. Carefully align and join the pieces together using wood glue and screws. Use clamps to secure the joints while the glue dries completely. Ensure corners are square and the frame is level to avoid any structural issues later.
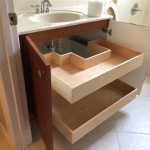
Once the frame is assembled, you can start adding internal shelves and drawers. Follow the same process of cutting, joining, and securing the wood pieces. Use wood glue and appropriate hardware for these components. Ensure that shelves and drawers are positioned according to your design, allowing for easy access and optimal storage space.
4. Installing Doors and Drawers
After the vanity frame and internal components are complete, it's time to install the doors and drawers. Start by assembling the doors and drawer fronts according to your chosen design. Attach hinges to the doors using screws and allow them to open and close smoothly.
Install drawer slides to the sides of the vanity frame, ensuring they are secured and aligned correctly. Attach the assembled drawer fronts to the slides, making sure they glide smoothly in and out. For a polished look, check the alignment of doors and drawers to ensure they are flush and even.
Once all doors and drawers are installed, take your time to adjust them for proper opening and closing. Ensure they operate smoothly and without any resistance. This careful installation will enhance the overall functionality and aesthetics of your corner vanity.
5. Finishing and Installation
With the vanity frame, shelves, drawers, doors, and hardware in place, it's time to apply the finishing touches. Sand down the entire vanity to create a smooth surface. You can use various grades of sandpaper, starting with coarser grades for initial sanding and finishing with finer grades for a smooth finish.
Apply primer if desired, followed by your chosen paint or stain. Let the primer and paint dry completely before proceeding to the next step. If you're using a countertop material that requires special installation, follow the manufacturer's instructions. Secure the countertop to the vanity frame using appropriate adhesives or fasteners.
Finally, install the sink and faucet (if applicable), ensuring proper plumbing connections. Once everything is in place and secure, clean the entire vanity thoroughly to remove dust and debris. Enjoy your newly made corner bathroom vanity, which adds both functionality and style to your bathroom space.

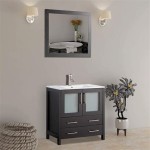
20 Beautiful Corner Vanity Designs For Your Bathroom Housely Rustic Bathrooms Barn Wood Vanities

20 Beautiful Corner Vanity Designs For Your Bathroom Housely Remodel

Corner Bathroom Vanities For Stylish And Uncluttered Spaces

Making A Bathroom Vanity From Reclaimed Materials

Modern And Stylish Diy Concrete Bathroom Renovations

Corner Bathroom Vanities For Stylish And Uncluttered Spaces

Make The Most Of Your Space With A Corner Bathroom Vanity Hut

Corner Bathroom Vanities For Stylish And Uncluttered Spaces

Corner Bathroom Sinks

Amazing Corner Vanity Ideas That You Will Find Useful
Related Posts