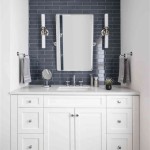
How To Redo Bathroom Countertops Without Replacing
A bathroom remodel can be a significant investment, but it doesn't always require a full gut job. One area where cost-effective updates can be achieved is the countertop. Replacing countertops can involve the expense of materials, labor, and potential damage to surrounding areas. Fortunately, there are several ways to revitalize your bathroom countertops without resorting to complete replacement. These methods offer a blend of affordability and aesthetic enhancement, allowing you to refresh the look of your bathroom without breaking the bank.
Re-grouting and Cleaning
Often, the appearance of a bathroom countertop is compromised by dirty grout lines. Over time, these grout lines can become discolored, stained, or even cracked. The first step in redoing your bathroom countertop without replacement is to thoroughly clean and re-grout the existing grout. This process involves removing the old grout, cleaning the surface, and applying fresh grout.
To clean the existing grout, you can use a commercial grout cleaner or a homemade solution of baking soda and water. Apply the cleaner to the grout lines and allow it to sit for a few minutes before scrubbing with a stiff-bristled brush. Rinse the area thoroughly with water and allow it to dry completely.
Once the grout is clean, you can begin the re-grouting process. This requires removing the old grout, which can be done with a grout removal tool or a utility knife. Be careful not to damage the tile or the surrounding surfaces during this step. Once the old grout is removed, clean the area thoroughly and apply fresh grout. Make sure to follow the manufacturer's instructions for setting time and curing time.
Re-grouting can dramatically improve the appearance of your bathroom countertops, particularly if the existing grout is stained or cracked. This process is relatively inexpensive and can be done by a homeowner with basic DIY skills.
Painting or Staining
If your bathroom countertops are made of a material that can be painted or stained, such as laminate or concrete, this is a cost-effective way to update their appearance. With the right preparation and techniques, you can transform a dated or worn countertop into a fresh and stylish focal point.
The first step is to prepare the surface for painting or staining. This involves cleaning the countertop thoroughly with a degreaser to remove any dirt, grime, or residue. Once the surface is clean, it's essential to sand it down to create a smooth, even surface for the paint or stain to adhere to. Sanding also helps to remove any imperfections or scratches that may be present.
After sanding, apply a primer to the countertop. This helps to improve the adhesion of the paint or stain and creates a more even finish. Choose a primer specifically designed for the material of your countertop and follow the manufacturer's instructions carefully. Allow the primer to dry completely before proceeding to the next step.
Now you can apply the paint or stain. If you're using paint, choose a high-quality, durable acrylic or epoxy paint designed for bathroom surfaces. If you're using a stain, select a stain that complements the existing color scheme of your bathroom or creates the desired effect. Apply the paint or stain in thin coats, allowing each coat to dry completely before applying the next.
Painting or staining your bathroom countertops can be a cost-effective way to give them a fresh, updated look. However, it's essential to follow the proper techniques and use high-quality materials to ensure a long-lasting finish.
Applying a Tile Overlay
For a more significant transformation, consider applying a tile overlay to your existing countertops. This technique involves installing a new layer of tile over the existing surface, creating a completely new look.
Before beginning this project, ensure your existing countertop is structurally sound. If you have any cracks or loose tiles, address these issues prior to applying the overlay. The first step in this method is to prepare the surface for the new tile. This involves cleaning the countertop thoroughly and applying a layer of thin-set mortar adhesive.
Once the adhesive has dried, you can begin installing the new tile. This process involves using a tile saw to cut the tiles to size and then using a tile trowel to spread a layer of thin-set adhesive onto the countertop. Apply the tiles to the adhesive, ensuring they are level and flush with each other.
After the tiles have been installed, allow them to dry completely. Then grout the tile joints, using a grout color that complements the tile and the overall bathroom design. Finally, seal the grout to protect it from stains and moisture.
Applying a tile overlay can give your bathroom countertops a completely new look and feel. It's a more involved process than painting or staining, but it can result in a highly durable and visually appealing finish.
Update Your Countertops Without Replacing Them
How Do I Redo My Countertops Without Replacing Them Rapid Refinishing Co
Update Your Countertops Without Replacing Them
Change The Color Of Laminate Countertops Without Replacing Them
Revamp Your Bathroom Vanity With These Budget Friendly Transformations
Paint Bathroom Vanity Countertop Sink So Easy A Piece Of Rainbow
Diy Updates For Your Laminate Countertops Without Replacing Them
How Do I Redo My Countertops Without Replacing Them Rapid Refinishing Co
How To Makeover A Bathroom Without Remodeling
Diy Bathroom Vanity And Countertop Makeover
Related Posts