How to Remove Old Bathroom Sink Drain Pipes in Japan
Replacing bathroom sink drain pipes in Japan requires a combination of careful preparation, understanding of local plumbing practices, and adherence to safety regulations. While the specific steps may vary slightly depending on the age and design of your bathroom, a general understanding of the process can provide a solid foundation for the project. This article outlines the key steps involved in removing old bathroom sink drain pipes in Japan, emphasizing safety and efficiency.
1. Preparation and Safety Precautions
Before embarking on the removal process, it is crucial to prioritize safety and prepare the workspace adequately. This involves the following steps:
- Turn off the water supply: Locate the main water valve for your bathroom and shut it off completely. This ensures that no water will flow while you are working on the drain pipes.
- Prepare the workspace: Clear the area around the sink and drain pipes to provide enough space for maneuvering and tool placement. Remove any items that might obstruct your work.
- Wear protective gear: Utilize appropriate personal protective equipment (PPE), including gloves, eye protection, and possibly a respirator mask, depending on the condition of the pipes. This will minimize the potential for exposure to dust, debris, and any hazardous materials.
- Prepare disposal: Ensure you have a suitable container for collecting and disposing of the old drain pipes. This can be a large plastic bag or a dedicated waste bin. Follow local regulations for the disposal of materials like metal and plastic.
2. Disconnecting the Drain Pipes
The next step involves disconnecting the drain pipes from their various connections. This process typically involves:
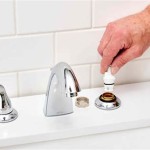
- Removing the drain stopper: The pop-up style stopper found in many Japanese bathroom sinks often requires a special tool or technique for removal. Consult the manufacturer's instructions or search online for specific guides for your model.
- Disconnecting the overflow pipe: The overflow pipe connects the sink to the main drain and prevents water from overflowing. Disconnect this pipe by loosening the nut where it joins the drain pipe using a wrench.
- Disconnecting the tailpiece: The tailpiece is the short pipe connecting the sink drain to the main drain pipe. Unscrew the tailpiece from the drain pipe using a wrench or pipe wrench.
- Disconnecting the trap: The trap is the curved section of pipe located beneath the sink, designed to prevent sewer gases from entering the bathroom. Use a wrench to loosen and remove the connection between the trap and the tailpiece.
- Disconnecting the drain pipe from the wall: The main drain pipe is typically connected to the wall with a threaded connector. Use a wrench or pipe wrench to carefully loosen and remove this connection.
When disconnecting the drain pipes, be cautious and avoid using excessive force. If any parts are rusty or stuck, consider applying a penetrating oil like WD-40 to loosen the connection. If any fittings are too difficult to remove, consult a professional plumber for assistance.
3. Removing the Old Pipes
Once the drain pipes are disconnected, you can proceed to remove them from the bathroom. This may involve the following steps:
- Removing the trap: If the trap is made of PVC or ABS plastic, it can be easily removed by hand. If it is made of metal, you may need to use a pipe wrench to loosen it from any remaining connections.
- Removing the tailpiece: Similarly, if the tailpiece is made of plastic, you can likely remove it by hand. Metal tailpieces may require the use of a wrench.
- Removing the main drain pipe: The main drain pipe may be secured to the wall with brackets, which should be removed before proceeding. Once the brackets are removed, you can pull the pipe out of the wall carefully, being mindful of any potential obstructions or leaks.
As you remove the pipes, remember to be mindful of any pipes that connect to the drain system, such as the vent pipe or pipes from other fixtures. If you are unsure about any part of the system, consult a professional plumber or refer to the building's plumbing diagrams.
The removal process may involve dealing with old pipes that are corroded or fragile. Exercise caution and use appropriate tools to avoid damaging the pipe or yourself. If any of the pipes show signs of serious damage or leaking, it is advisable to consult a professional plumber.

How To Use Japanese Chemical Drain Cleaners

Drain Cleaners Will Us Use This One Crazy Trick From Japan To Get Rid Of Sink Slime Soranews24 News

Japan Original Effective Sink Clogged Remover 500ml Dissolves Grease Hair Oils Dredging Agent Drain Cleaner For Kitchen Sewer Toilet Clog Pipe Bowl Declogger Drainage Lazada

Japan Original Effective Sink Clogged Remover 500ml Dissolves Grease Hair Oils Dredging Agent Drain Cleaner For Kitchen Sewer Toilet Clog Pipe Bowl Declogger Drainage Lazada

How To Fix Or Replace A Leaky Sink Trap Hometips Drain Repair Replacing Kitchen

How To Fit A Bathroom Sink Diy Guides Victorian Plumbing

How To Remove A Stuck Bathroom Sink Drain Upgradedhome Com

3 Homemade Drain Cleaners That Won T Ruin Your Pipes

How To Clear A Blocked Waste Pipe Kitchen Bathroom

No Drano Problem You Can Unclog Your Kitchen Sink Without Harsh Chemicals Cnet
Related Posts