How to Replace Bathroom Taps
Replacing bathroom taps is a common DIY project that can significantly enhance the look and functionality of your bathroom. Whether your taps are old, leaking, or simply outdated, replacing them can be a rewarding experience. This guide provides a step-by-step process for replacing bathroom taps, ensuring a smooth and successful outcome.
Gather the Necessary Tools and Materials
Before embarking on the replacement process, it is essential to gather all the required tools and materials. This will ensure a smooth and efficient operation. The following list outlines the essential tools and materials:
- New bathroom taps (compatible with your existing plumbing system)
- Adjustable wrench
- Basin wrench (if applicable)
- Channel lock pliers
- Teflon tape
- Pipe wrench (optional)
- Screwdriver (for removing escutcheons and handles)
- Bucket or container for collecting water
- Rag or cloth for cleaning
- Safety glasses
- Gloves (optional)
It is recommended to purchase high-quality taps from reputable brands to ensure longevity and durability. Additionally, check the compatibility of the new taps with your existing plumbing setup, particularly the thread size and style. This will prevent any issues during installation.
Turn Off the Water Supply
Before disassembling any plumbing fixtures, it is imperative to shut off the water supply. This will prevent any potential flooding or water damage. The location of the water shut-off valve may vary depending on the plumbing system. In most cases, the main shut-off valve is located near the water meter or in the basement. Locate and turn the valve clockwise until it stops, effectively shutting off the water supply.
To ensure that the water is completely shut off, open the taps to drain any remaining water in the pipes. This will minimize the risk of water spilling during the replacement process.
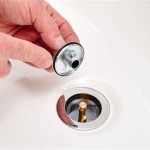
Remove the Old Taps
Once the water supply is shut off, you can start removing the old taps. Begin by removing the handle or lever using a screwdriver or wrench. The handle is typically secured by a screw or nut, depending on the tap model. Once the handle is removed, locate the mounting nuts that secure the tap to the sink or wall. Use an adjustable wrench or basin wrench to loosen and remove these nuts. If the nuts are stubborn, you can use a pipe wrench for added leverage, but be cautious to avoid damaging the surrounding surfaces.
After removing the mounting nuts, the tap should come loose from the sink or wall. Pull the tap gently to detach it. If there is any resistance, carefully investigate the connection point, and if necessary, use a wrench to loosen any remaining parts.
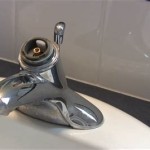
Install the New Taps
With the old taps removed, it is time to install the new taps. Begin by wrapping the threads of the new tap with Teflon tape. This creates a watertight seal and prevents leaks. Start wrapping the tape at the end of the thread, ensuring that each layer overlaps the previous one. Wrap the tape tightly, but avoid over tightening, as this could damage the thread.
Next, thread the new tap into the opening in the sink or wall. Make sure the tap is properly aligned and secure. Use the adjustable wrench or basin wrench to tighten the mounting nuts. Tighten the nuts securely, but avoid over tightening, as this could damage the tap or sink.
Once the new tap is securely in place, install the handle or lever. Make sure to align the handle correctly, so it engages properly with the tap's internal mechanism. Secure the handle with the appropriate screw or nut.
Turn on the Water Supply and Test for Leaks
After securing the new tap, carefully turn on the water supply. Open the taps slowly and check for any leaks or drips. If you notice any leaks, tighten the mounting nuts or check the Teflon tape to ensure it is properly wrapped. Look for signs of water seepage around the joint where the tap connects to the sink or wall. If you see leaks at these spots, try tightening the mounting nuts or readjusting the tap.
It is essential to test both hot and cold water lines to ensure proper operation. If there are no leaks, the replacement process is complete.
Clean Up and Dispose of Old Taps
Finally, clean up any spilled water or debris. Dispose of the old taps responsibly. Many waste disposal sites accept old plumbing fixtures. Check with your local waste disposal authority for instructions. The replacement process is now complete, and you can enjoy your newly installed bathroom taps.

How To Easily Replace Basin Taps Step By

How To Replace Bathroom Taps Big

How To Easily Replace Bath Taps Step By Victorian Plumbing

How To Replace A Bathroom Faucet Home Repair Tutor

How To Change Bathroom Taps Everything You Need Know

How To Replace Or Fit Basin Taps Lever Plumbing Tips

How To Replace Taps In The Bathroom

Single Lever Mono Basin Flow Cartridge Maintenance And Replacement

How To Replace A Bathroom Faucet Tinged Blue

How To Install Basin Taps Replacing A Bathroom Sink Tap
Related Posts