How to Set Bathroom Sink Drain
A properly installed bathroom sink drain is essential for efficient water removal and preventing plumbing issues. While it may seem like a simple task, setting a bathroom sink drain requires careful attention to detail and adherence to specific steps to ensure proper functionality and longevity. This article provides a comprehensive guide on how to set a bathroom sink drain effectively, outlining key considerations and procedures for a successful installation.
Preparing for the Installation
Before embarking on the installation process, it's crucial to gather the necessary tools and materials to ensure a smooth and efficient operation. These include:
- A new drain assembly, consisting of a tailpiece, strainer, and mounting nut
- Plumber's putty
- Teflon tape
- Adjustable wrench
- Channel-lock pliers
- Screwdriver
- Level
- Bucket
- Work gloves
- Safety glasses
Once the necessary tools and materials are ready, the next step involves disconnecting the existing drain assembly. This usually involves unscrewing the mounting nut beneath the sink, removing the strainer and tailpiece, and carefully disconnecting the drainpipe from the main drain line. While disconnecting, it's essential to have a bucket readily available to catch any residual water.
Installing the New Drain Assembly
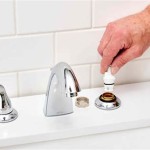
After disconnecting the old drain assembly, the new drain assembly can be installed. First, ensure the tailpiece is the appropriate length for your sink. If necessary, cut the tailpiece to a suitable length using a hacksaw. Next, apply a thin bead of plumber's putty around the base of the strainer, ensuring it's evenly distributed. This will create a watertight seal when the strainer is fitted onto the sink.
Place the strainer onto the sink's drain opening and carefully tighten the mounting nut beneath the sink using an adjustable wrench. Avoid overtightening, as it can damage the sink or the mounting nut. After attaching the strainer, connect the tailpiece to the drainpipe, ensuring a secure connection. Wrapping the threads of the tailpiece with Teflon tape before connecting it to the drainpipe helps create a leak-proof seal.
Testing for Leaks
Once the drain assembly is installed, it's crucial to test for leaks. Turn on the water supply and allow the sink to fill with water. Carefully inspect the connections for any signs of leaks, such as dripping or damp spots. If leaks are detected, tighten the connections accordingly. If the leaks persist, it may be necessary to reapply plumber's putty or Teflon tape.
After ensuring no leaks, check the drain's functionality. Allow the water to drain and observe the flow rate. If the water drains slowly, it may be due to a blockage further down the drain line.
Additional Considerations
While the above steps provide a comprehensive guide, there are several additional considerations to ensure a successful installation.
Choosing the Right Drain Assembly
When selecting a new drain assembly, consider factors such as the sink's size, the style of the fixture, and the desired functionality. For instance, some drain assemblies have overflow features that prevent water from spilling over the sink's rim.
Ensuring Proper Alignment
Before tightening the mounting nut, ensure the strainer is properly aligned with the sink's drain opening. Misalignment can result in uneven water flow and potential leaks.
Using the Right Tools
Using the appropriate tools for the job is essential to avoid damaging the drain assembly or sink. An adjustable wrench is ideal for tightening the mounting nut, while channel-lock pliers can be used to grip the tailpiece securely when connecting it to the drainpipe.
Setting a bathroom sink drain is a routine plumbing task that can be accomplished with the right tools and knowledge. By following the steps outlined in this article and paying attention to detail, individuals can ensure a successful installation that provides efficient water removal and lasting functionality. Remember to always prioritize safety and use caution when working with plumbing systems.

Install A Drain Stopper So The Is Removable

How To Install Bathroom Sink Drain Queen Bee Of Honey Dos

Installing A Bathroom Sink Drain Efficient Plumber

How To Connect A Bathroom Sink Drain

How To Install Bathroom Sink Drain Queen Bee Of Honey Dos

How To Install A Pipe From Sink Drain Wall Ehow

How To Install The P Trap Under A Sink Dummies

How To Install Bathroom Sink Drain Queen Bee Of Honey Dos

How To Install Bathroom Sink Drain Plumbing

How Replace A Bathroom Sink Drain
Related Posts