How to Stop a Leaking Bathroom Sink Tap
A leaky bathroom sink tap can be a nuisance, wasting water and potentially causing damage to your bathroom. Fortunately, stopping a leaky tap is often a straightforward task that can be tackled with minimal tools and a bit of know-how. This article provides a comprehensive guide to identifying the source of the leak and implementing effective solutions.
1. Identifying the Source of the Leak
The first step to stopping a leaky tap is to determine the source of the leak. This might seem obvious, but there are a few different types of leaks that can occur in a bathroom sink tap.
Dripping Leak: This is the most common type of leak, where water drips from the tap spout even when it is turned off. The source of this leak is usually a worn-out washer or O-ring within the tap cartridge.
Continuous Flow: A constant flow of water from the tap, even when it is turned off, indicates a problem with the tap's internal mechanism, such as a faulty valve or a broken stem.
Leak from the Base of the Tap: Water leaking from the base of the tap, around the connection to the sink, suggests a loose connection or a cracked pipe.
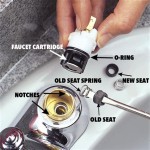
2. Addressing a Dripping Leak
A dripping leak is often the easiest to address. Here's a step-by-step guide:
1. Shut Off the Water Supply: Locate the shut-off valve for your sink, usually located under the sink or on the wall behind the sink. Turn the valve clockwise to stop the water flow.
2. Remove the Tap Handle: Use a screwdriver to remove any screws or caps holding the tap handle in place. Once removed, gently pull the handle off the tap stem.
3. Access the Cartridge: Some tap designs require removing a decorative cap or cover before accessing the cartridge. The cartridge is typically a cylindrical component that holds the washer and other internal parts.
4. Replace the Washer or O-Ring: Carefully remove the old washer or O-ring from the cartridge. If you can't easily remove the old one, use a small screwdriver or pliers to gently pry it out. Ensure the new washer or O-ring is the correct size and type for your tap model.
5. Reassemble the Tap: Place the new washer or O-ring into the cartridge and reassemble the tap in reverse order. Ensure the handle is securely attached and the cartridge is properly seated within the tap.
6. Turn On the Water Supply: Slowly open the shut-off valve to check for leaks. If there are still leaks, repeat the steps above to ensure proper installation of the washer or O-ring.
3. Repairing a Continuous Flow Leak
A continuous flow leak is often a sign that the tap's internal mechanism needs repair or replacement. While the repair process might vary depending on the tap model, the general steps include:
1. Turn Off the Water Supply: As with a dripping leak, shut off the water supply to the sink.
2. Remove the Tap Handle and Cartridge: Follow the steps above to remove the tap handle and access the cartridge.
3. Inspect the Cartridge: Examine the cartridge for signs of wear, damage, or corrosion. If the problem is a worn-out washer or O-ring, replace it as described in the previous section.
4. Examine the Valve: If the cartridge appears fine, inspect the valve. The valve is a component that controls the water flow through the tap. Look for signs of damage, corrosion, or loose components.
5. Replace or Repair the Valve: If the valve is damaged or worn, it may need to be replaced. You can purchase a new valve specifically designed for your tap model. If the problem is a loose component within the valve, such as a spring or a washer, try tightening it or replacing it with a new one.
6. Reassemble the Tap: Once the valve is repaired or replaced, reassemble the tap, and carefully check for leaks after turning the water back on.
4. Addressing a Leak from the Base of the Tap
A leak from the base of the tap is usually caused by a loose connection or a cracked pipe. To address this type of leak:
1. Turn Off the Water Supply: Shut off the water supply to the sink.
2. Inspect the Connections: Examine the connections between the tap and the sink. Look for loose nuts or bolts.
3. Tighten the Connections: Use a wrench to tighten any loose nuts or bolts. If this doesn't stop the leak, there might be a problem with the pipe itself.
4. Check for Cracked Pipes: Look for cracks or breaks in the pipe leading to the tap. You may need to replace the damaged section of pipe.
5. Seek Professional Help: If you're unsure about any of these steps or if the leak persists, it's best to contact a qualified plumber for assistance. They have the expertise and tools to diagnose and repair more complex plumbing issues.

How To Fix A Dripping Tap Living By Homeserve

How To Fix A Leaky Faucet True Value

How To Fix A Dripping Tap

5 Reasons Your Faucet Is Dripping Water How To Fix It

Properly Fixing A Leaky Sink Faucet Wallside Windows

5 Reasons Your Faucet Is Dripping Water How To Fix It

How To Fix A Leaking Tap Ryan Old Plumbing

How To Fix A Leaky Faucet Forbes Home

How To Fix A Leaky Faucet Guides For Every Design And Style

How To Fix Pipework A Tap Faucet Leaking Under The Sink
Related Posts