How to Take Out a Moen Bathroom Faucet
Replacing a bathroom faucet is a common home improvement project that can be tackled by most DIY enthusiasts. Moen faucets, known for their quality and durability, can sometimes require replacement due to wear and tear, leaks, or simply a desire for a new style. This guide will outline the steps involved in removing a Moen bathroom faucet, ensuring a smooth and successful process.
1. Gather the Necessary Tools
Before starting the removal process, it's essential to gather the necessary tools. This will ensure a smooth and efficient operation:
- Adjustable wrench
- Channel-lock pliers
- Phillips screwdriver
- Flathead screwdriver
- Basin wrench (optional, but highly recommended)
- Rag or towel
- Bucket
- Optional: Plumber's tape
2. Turn Off the Water Supply
The first step is to shut off the water supply to the faucet. This is crucial to prevent flooding and unnecessary water damage. Locate the shut-off valves for the hot and cold water lines leading to the faucet. These valves are usually located under the sink or on the wall behind the faucet. Turn both valves clockwise until they are completely closed. To confirm the water supply is off, turn on the faucet and check for any leaks or water flow.
3. Drain the Water Lines
After turning off the water supply, drain the water lines to prevent any residual water from causing problems during the removal process. This is a simple but essential step. Open the faucet handles and allow any remaining water to drain into a bucket placed beneath the sink. This will ensure a dry working environment and prevent any potential water damage.
4. Remove the Faucet Handles
With the water supply turned off and the lines drained, the next step is to remove the faucet handles. Most Moen faucets have a decorative cap or cover that can be removed by hand or with a flathead screwdriver. Once the cap is removed, you'll see a screw or set screw that secures the handle. Use a Phillips screwdriver to loosen and remove this screw. Gently pull the handle off the faucet stem. Repeat these steps for both the hot and cold water handles.
5. Disconnect the Supply Lines
The next step involves disconnecting the supply lines that connect the faucet to the hot and cold water lines. These lines are typically made of flexible braided metal and have a compression nut that secures them to the faucet. Using an adjustable wrench, gently loosen and remove these nuts. If the nuts are stubborn, use a channel-lock pliers to get a better grip. Place a rag or towel under the connection to catch any dripping water. Once the nuts are removed, carefully pull the supply lines away from the faucet.
6. Remove the Faucet Body
With the handles and supply lines disconnected, the faucet body can be removed. Use a basin wrench to hold the faucet body from below while loosening the mounting nut from above. The mounting nut, located beneath the faucet, secures the faucet to the sink. Turn it counterclockwise to loosen it. Depending on the age and condition of the faucet, the nut may be difficult to loosen. If this is the case, use a channel-lock pliers to get a better grip. Once the mounting nut is loose, gently lift the faucet body up and out of the sink.
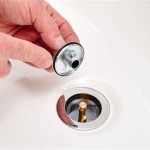
7. Remove the Pop-Up Drain
If your Moen bathroom faucet has a pop-up drain, you'll need to remove this as well. First, locate the drain's lift rod, which is a metal rod that connects the drain to the lever assembly. Remove the lift rod by pulling it up and out of the drain. Next, unscrew the drain cover. This is typically a threaded cap that can be removed by hand. Once the cover is removed, you can access the drain assembly itself. To remove the assembly, there may be a small screw or set screw that needs to be loosened. Once this is removed, you can pull the drain assembly up and out of the sink.
By following these steps, you can safely and effectively remove a Moen bathroom faucet. Remember to always prioritize safety and take precautions to prevent water damage. If you encounter any difficulties or have any doubts about the process, it's best to consult a professional plumber.

How To Remove Moen Bathroom Faucet Handle In 2 Steps

How Do I Replace My Moen Bathroom Faucet Cartridge

Moen Circa 2008 Kitchen Faucet Removal

Bathroom Faucet Cartridge Replacement

Moen Faucet Stuck How To Remove A Monticello Tools For Removing Bathroom Facuet

How To Replace Repair A Leaky Moen Cartridge In Bathroom Set Of Faucets Single Lever Tips

Tighten A Loose Lever On Moen Brantford Faucet

Moen Liso Single Hole Bathroom Faucet Costco

Moen Eva 8 In Widespread 2 Handle Bathroom Faucet Trim Kit Brushed Nickel Valve Included T6420bn 9000 The Home Depot

T990 By Moen Cau Chrome Two Handle Low Arc Roman Tub Faucet Studio41
Related Posts