Kohler Bathroom Sink Faucet Cartridge Removal: A Comprehensive Guide
A leaky faucet is a common household nuisance, often escalating into a significant waste of water and potentially causing damage to plumbing fixtures. In many Kohler bathroom sink faucets, the culprit behind a persistent drip is a worn or damaged cartridge. The cartridge is a crucial component that controls the flow and mixing of hot and cold water. Replacing the cartridge is a task that can often be accomplished by homeowners with basic plumbing knowledge and tools, avoiding the expense of a professional plumber. This article provides a comprehensive guide to removing a Kohler bathroom sink faucet cartridge, covering essential preparation, step-by-step instructions, and troubleshooting tips.
Before embarking on any plumbing repair, safety is paramount. Certain precautions must be taken to prevent injury and damage to plumbing systems. Beginning by gathering the necessary tools and materials is an essential part of preparing for the removal process. In addition, identifying the specific Kohler faucet model is crucial for obtaining the correct replacement cartridge.
Preparation and Safety Precautions
Before initiating the faucet cartridge removal process, several preparatory steps are necessary. First and foremost, shut off the water supply to the faucet. This is typically accomplished by turning off the shut-off valves located beneath the sink. If these valves are absent or malfunctioning, the main water supply to the house may need to be turned off. Once the water supply is shut off, open the faucet to relieve any remaining pressure in the lines. This prevents unexpected spray or leakage during the disassembly process.
Next, gather the required tools and materials. These typically include: a flathead screwdriver, a Phillips head screwdriver, an Allen wrench set (various sizes), adjustable pliers or a basin wrench, penetrating oil (such as WD-40), a new Kohler faucet cartridge (the correct model for the specific faucet), a clean cloth or towel, and safety glasses. Having these items readily available will streamline the removal process and minimize potential delays.
Wearing safety glasses protects the eyes from debris or water spray that may occur during the procedure. Using a clean cloth or towel around the work area prevents scratches on the sink surface and provides a convenient space to place removed parts. Applying penetrating oil to potentially seized screws or connections can significantly ease the disassembly process.
Identifying the specific Kohler faucet model is crucial for ensuring the correct replacement cartridge is obtained. Kohler faucets come in various designs, each requiring a specific cartridge type. The faucet model number is typically found on the original packaging, the installation manual, or stamped on the faucet body itself. Once the model number is identified, the appropriate replacement cartridge can be purchased from a plumbing supply store or online retailer.
Step-by-Step Cartridge Removal Procedure
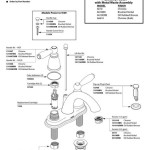
The following steps outline the general procedure for removing a Kohler bathroom sink faucet cartridge. However, it's essential to consult the specific installation manual or online resources for the particular Kohler faucet model, as slight variations may exist. The process typically involves removing decorative caps, handles, and other components to access the cartridge.
The first step usually involves removing the decorative cap(s) on the faucet handle(s). These caps are often secured with a snap-fit mechanism or a small screw. Use a flathead screwdriver or a small blade to carefully pry off the cap. Avoid excessive force, as this can damage the cap or the surrounding faucet finish.
Once the decorative cap is removed, the handle's retaining screw is typically exposed. This screw may be a Phillips head or an Allen head screw. Use the appropriate screwdriver or Allen wrench to loosen and remove the screw. After removing the screw, the handle should lift off the faucet body. If the handle is stuck, gently rock it back and forth while pulling upwards. Avoid using excessive force, as this can damage the handle or the faucet stem.
With the handle removed, the faucet escutcheon (the decorative plate surrounding the faucet stem) may need to be removed. The escutcheon may be secured with screws or a threaded connection. If screws are present, remove them with the appropriate screwdriver. If the escutcheon is threaded, carefully unscrew it by hand or with adjustable pliers. Protect the faucet finish with a cloth when using pliers.
Upon removing the escutcheon, the cartridge retaining clip or nut becomes visible. The retaining clip is usually a small, horseshoe-shaped piece of metal that secures the cartridge in place. Use a flathead screwdriver or pliers to carefully remove the clip. If a retaining nut is present, use an adjustable wrench or basin wrench to loosen and remove the nut. Exercise caution, as the nut may be corroded or seized.
With the retaining clip or nut removed, the cartridge can now be extracted from the faucet body. Grasp the cartridge firmly and gently pull it straight out. If the cartridge is stuck, try applying penetrating oil around the cartridge body and let it sit for a few minutes. Then, try wiggling the cartridge back and forth while pulling upwards. Avoid twisting or rotating the cartridge, as this can damage the faucet body.
Once the old cartridge is removed, inspect the faucet body for any debris or corrosion. Clean the area thoroughly with a clean cloth. Before installing the new cartridge, lubricate the O-rings on the new cartridge with silicone grease. This will ensure a smooth installation and prevent leaks.
Troubleshooting Common Problems
During the cartridge removal process, several common problems may arise. These include stuck handles, seized retaining nuts, and difficulty removing the cartridge itself. Addressing these issues systematically can prevent damage to the faucet and ensure a successful repair.
A stuck handle can be a common issue, especially in older faucets. Applying penetrating oil around the handle base and letting it sit for a few minutes can help loosen the handle. Gently rocking the handle back and forth while pulling upwards can also help dislodge it. If the handle is severely corroded, a handle puller tool may be necessary. A handle puller provides leverage to safely remove the handle without damaging the faucet body.
A seized retaining nut can be particularly challenging to remove. Applying penetrating oil and allowing it to soak for an extended period can often loosen the nut. Using a basin wrench provides additional leverage for removing the nut. If the nut is severely corroded, it may be necessary to carefully cut the nut with a hacksaw or a rotary tool. Exercise extreme caution when cutting the nut to avoid damaging the faucet threads.
If the cartridge itself is difficult to remove, applying penetrating oil around the cartridge body and letting it sit for a few minutes can help loosen it. Gently wiggling the cartridge back and forth while pulling upwards can also help dislodge it. Avoid twisting or rotating the cartridge, as this can damage the faucet body. In some cases, a cartridge puller tool may be necessary. A cartridge puller is a specialized tool that provides a secure grip on the cartridge and allows for controlled extraction.
After the new cartridge is installed, it is important to test the faucet for leaks. Turn the water supply back on slowly and check for any leaks around the cartridge, handle, and spout. If leaks are present, double-check that the cartridge is properly seated and that all connections are tight. In some cases, it may be necessary to replace the O-rings on the new cartridge or to apply plumber's tape to the threads of the faucet body.
Regular maintenance can help prevent future problems with the faucet cartridge. Periodically cleaning the faucet and applying silicone grease to the cartridge can prolong its lifespan. Also, it is important to avoid over-tightening the faucet handles, as this can damage the cartridge and lead to leaks.

How To Remove Kohler Bathroom Faucet Cartridge Bargain

Kohler Wide Spread Taboret Lavatory Faucet Stems Replaced

Kohler Faucet Replace Spline Insert

How To Remove A Kohler Faucet Cartridge Ehow

How To Remove A Single Stem Kohler Kitchen Faucets Infinity

Kohler Sundae 4 In Centerset 2 Handles Bathroom Faucet Matte Black K R28796 4d Bl The Home Depot

Kohler Metal Faucet Repair Kit Most Two Handle Faucets From 1990 To 2010 In The Kits Components Department At Com

Kohler 1 4 In Turn Ceramic Cartridge Hot Used Most Faucets Rgp77005 Rp The Home Depot

Kohler Metal Faucet Repair Kit Most Valves From 1990 2010 In The Kits Components Department At Com

How To Fix A Leaky 2 Handle Faucet Replace Bathroom Sink Repair
Related Posts