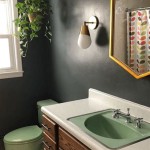
Painting Plastic Bathroom Vanity: A DIY Guide to Refreshing Your Bathroom
A plastic bathroom vanity, though practical and affordable, might not always be the most visually appealing. Over time, the color can fade, and scratches and dings can mar its surface. But before you consider replacing it entirely, consider giving it a fresh look with a coat of paint. Painting a plastic bathroom vanity is a relatively simple DIY project that can transform the look of your bathroom without breaking the bank. This article will guide you through the process, providing you with the necessary steps and helpful tips for a successful paint job.
Preparing the Surface: The Foundation of a Successful Paint Job
Before you grab the paintbrush, it is crucial to properly prepare the surface of the vanity. This step ensures the paint adheres properly and provides a long-lasting finish. Follow these steps to ensure a smooth and even surface:
- Clean the Vanity: Begin by thoroughly cleaning the vanity with a mild detergent and warm water. Remove any grime, soap scum, or residue that might interfere with the paint adhesion. Wipe the surface down with a clean cloth to ensure it's completely dry.
- Sand the Surface: Light sanding is essential to roughen the surface of the plastic vanity. Using fine-grit sandpaper (220-grit is recommended), gently sand the entire surface in a circular motion. This will create a better surface for the paint to adhere to.
- Degrease the Vanity: After sanding, wipe the vanity down with denatured alcohol or a degreaser to remove any dust, oils, or residue that may remain. This step ensures a clean and grease-free surface, allowing for optimal paint bonding.
- Prime the Vanity: Priming plastic surfaces is crucial for achieving a smooth and durable finish. Use a plastic primer specifically designed for adhesion to plastic surfaces. Apply the primer evenly using a brush or roller, and allow it to dry completely according to the manufacturer's instructions.
Choosing the Right Paint: Navigating the Options
With the surface properly prepared, the next step is selecting the right paint. Choosing the right paint is vital for creating a durable and visually pleasing finish. Here's what you need to consider:
- Acrylic Enamel Paint: This type of paint is ideal for bathroom vanities as it offers excellent durability, moisture resistance, and a smooth, hard finish. It comes in various colors and finishes, allowing you to choose the look you desire.
- Epoxy Paint: Epoxy paints are renowned for their durability and resistance to moisture, making them particularly suitable for bathroom environments. However, they require specific application techniques and may require more specialized tools.
- Specialty Plastic Paints: There are specialty paints formulated specifically for plastic surfaces. These paints provide excellent adhesion and durability, ensuring a long-lasting finish.
When choosing paint, it's essential to factor in the level of moisture exposure in your bathroom. For areas with high humidity, consider using a paint with mildew-resistant properties. Additionally, choose a finish that complements the overall style of your bathroom. A high-gloss finish can create a contemporary look, while a matte finish provides a more traditional feel.
Applying the Paint: Techniques for a Professional Finish
Once you have chosen your paint, you are ready to apply it. Here's a step-by-step guide to ensure a smooth and even application:
- Protect the Area: Before you begin painting, protect surrounding areas from paint splatter. Cover the floor with drop cloths, and use painter's tape to mask off any areas you don't want to paint.
- Apply Thin Coats: Apply the paint in thin, even coats. Avoid applying thick coats, as these can lead to drips, uneven coverage, and longer drying times. Allow each coat to dry completely before applying the next.
- Use a High-Quality Brush or Roller: Use a high-quality brush or roller specifically designed for the type of paint you are using. This ensures smooth application and minimizes brushstrokes. Apply the paint in long, even strokes, following the grain of the wood if applicable.
- Clean Up: After you have applied the final coat of paint, clean your brushes or roller with the appropriate solvent according to the paint manufacturer's instructions.
For best results, consider using a paint sprayer to apply the paint. A sprayer can provide a smooth, even finish, especially for larger surfaces. However, this method requires practice and ventilation.
Painting a plastic bathroom vanity is a simple and effective way to refresh the look of your bathroom. With the right preparation, paint, and techniques, you can achieve a professional and long-lasting finish. By following these steps, you can transform your dated vanity into a stylish and eye-catching centerpiece for your bathroom. Remember to allow adequate drying time before using the vanity, and enjoy the newly refreshed space.

How To Paint Melamine Cabinets A Small Bathroom Makeover Diy Soheila

How To Paint Laminate Cabinets Love Renovations

How To Paint A Bathroom Vanity Angela Marie Made

How To Paint Laminate Cabinets A Erfly House

Paint Bathroom Vanity Countertop Sink So Easy A Piece Of Rainbow

Vanity Make Over Removal Of Plastic Melamine Cabinet Fronts Paint And Antique

How To Paint Bathroom Cabinets Without Sanding 8 Vital Steps Grace In My Space

Paint Bathroom Vanity Countertop Sink So Easy A Piece Of Rainbow

How To Paint Laminate Cabinets A Erfly House
:strip_icc()/101922779-2cbc45e123c34827afb4f601723b03ca.jpg?strip=all "How To Paint Bathroom Countertops")
How To Paint Bathroom Countertops
Related Posts