Remove Delta Bathroom Faucet Aerator: A Step-by-Step Guide
Faucet aerators are essential components that help to regulate water flow and reduce splashing. However, over time, aerators can become clogged with mineral deposits and debris, leading to reduced water pressure and an uneven flow. If your Delta bathroom faucet aerator is experiencing these issues, removing and cleaning it might be necessary. This article provides a comprehensive guide on how to remove a Delta bathroom faucet aerator safely and effectively.
Understanding the Delta Bathroom Faucet Aerator
Before attempting to remove the aerator, it is crucial to understand its basic structure and function. Delta bathroom faucet aerators typically consist of a threaded outer casing and a removable screen or mesh inside. The screen is responsible for mixing air with water, creating a smooth, even flow. Mineral buildup and debris can clog this screen, causing the aerator to malfunction.
Tools and Materials Needed
To remove a Delta bathroom faucet aerator, you will need the following tools and materials:
- Adjustable wrench
- Pliers or a small screwdriver (optional)
- White vinegar or a commercial descaler solution (optional)
- Clean cloth or paper towels
- Bucket or bowl (optional)
Step-by-Step Guide to Removing a Delta Bathroom Faucet Aerator
Follow these steps to remove your Delta bathroom faucet aerator:
- Turn off the water supply: Locate the shut-off valve for your bathroom faucet and turn it off completely. This will prevent water from spilling during the removal process.
- Prepare a catch basin: Place a bucket or bowl underneath the faucet to catch any residual water that may drip from the aerator.
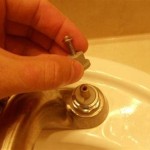
- Loosen the aerator: Use an adjustable wrench to grasp the aerator firmly. Remember, the aerator is usually threaded onto the faucet spout, so you will need to turn it counterclockwise to loosen it. Apply gentle but firm pressure to avoid damaging the aerator or the faucet spout.
- Unscrew the aerator: Once the aerator is loose, continue turning it counterclockwise until it comes off completely. If the aerator is stubborn, you can use pliers or a small screwdriver to help loosen it. Be careful not to scratch or damage the faucet finish.
- Clean the aerator: Once the aerator is removed, inspect the screen inside for mineral buildup and debris. If necessary, soak the aerator in white vinegar or a commercial descaler for a few hours to loosen the sediment. You can also use a small brush or toothbrush to scrub the screen gently.
- Reassemble the aerator: After cleaning, reassemble the aerator components and tighten it back onto the faucet spout. Ensure the aerator is securely fastened to prevent leaks. Remember to turn the water supply back on and check for any leaks.
Tips for Removing a Delta Bathroom Faucet Aerator
Here are some additional tips to make the process easier:
- Use a rubber-coated wrench: To prevent scratching the faucet finish, use a wrench with a rubber coating or wrap the wrench's jaws with a soft cloth.
- Apply lubricant: Before tightening the aerator back onto the faucet spout, apply a thin layer of plumber's tape or thread sealant to prevent leaks.
- Replace the aerator if necessary: If the aerator is severely damaged or worn out, it may be necessary to replace it. Contact a Delta dealer or plumber for a compatible replacement part.
When to Seek Professional Help
If you are unable to remove the aerator using the steps outlined above, or if you encounter any leaks or damage during the process, it is best to seek professional help from a qualified plumber. They will have the necessary experience and tools to address any complicated situations safely and effectively.

Delta Cache Aerator Wrench Rp52217 The Home Depot

How To Clean And Replace An Aerator By Delta

Delta Faucet Aerator Removal On 9113 Dst Or Rp80524

Delta Cache Aerator Wrench Rp52217 The Home Depot

Delta Faucet Aerator Cleaning How To Remove Clean Install New Replace Aerators

How To Fix Your Flow Delta Faucet Blog

Cache Aerators Recessed Or Faucet Faqs
Delta Faucet Aerator Removal Tool Irv2 Forums

Remove Water Faucet Aerator Delta

Delta Rp76076 Aerator And Wrench Build Com
Related Posts


