Repairing a Delta Bathroom Faucet Handle: A Comprehensive Guide
Bathroom faucets are essential fixtures subjected to frequent use. Over time, wear and tear can lead to various problems, including loose, wobbly, or completely detached handles. Repairing a Delta bathroom faucet handle is a task that many homeowners can undertake themselves, saving both time and money compared to calling a professional plumber. This article provides a detailed, step-by-step guide to diagnosing and repairing common Delta faucet handle issues.
Before commencing any repair work, it is crucial to identify the specific Delta faucet model. Delta Faucet Company produces a wide array of faucet designs, each potentially requiring a slightly different approach for handle repair. Common Delta faucet types include single-handle faucets, two-handle faucets, widespread faucets, and centerset faucets. Examining the faucet's overall design, handle style, and any visible model numbers will aid in determining the correct repair procedure and required parts.
Prior to initiating any repairs, safety precautions are paramount. The first step involves shutting off the water supply to the faucet. Typically, shut-off valves are located beneath the sink, one for hot water and one for cold water. Turn both valves clockwise until they are fully closed. After shutting off the water supply, turn on the faucet to relieve any residual pressure in the lines. Place a towel or bucket underneath the faucet to catch any remaining water.
Key Point 1: Diagnosing the Problem
The initial step in any repair process is accurately diagnosing the underlying problem. Several factors can contribute to a malfunctioning Delta faucet handle. A common issue is a loose handle, which may wobble or feel unstable. This is often caused by a loose set screw, worn-out O-rings, or damaged internal components. Another problem is a handle that rotates freely without controlling the water flow. This is frequently indicative of a stripped valve stem or a broken cartridge. A handle that is difficult to turn may be due to mineral buildup, corrosion, or a faulty cartridge.
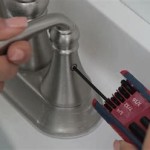
To properly diagnose the issue, carefully inspect the handle and its surrounding components. Look for any visible signs of damage, such as cracks, corrosion, or mineral deposits. Gently attempt to tighten the set screw (if applicable) using an Allen wrench. If the handle remains loose, proceed to disassemble the handle to inspect the internal components. Disassembly typically involves removing a decorative cap, loosening a set screw, and then pulling the handle off the faucet body. A thorough examination of these components will help pinpoint the source of the problem.
If the handle is difficult to turn, consider the age of the faucet. Older faucets are more susceptible to mineral buildup and corrosion, which can impede the smooth operation of the handle. In areas with hard water, mineral deposits can accumulate inside the faucet, restricting the movement of internal components. In such cases, cleaning or replacing the cartridge may be necessary.
Key Point 2: Replacing Worn Components
Once the problem has been diagnosed, the next step is to replace any worn or damaged components. Common replacement parts for Delta faucet handles include O-rings, cartridges, set screws, and valve stems. It is crucial to use genuine Delta replacement parts to ensure compatibility and optimal performance. Using generic or aftermarket parts may result in leaks, premature failure, or damage to the faucet.
O-rings are small rubber rings that seal the handle to the faucet body. Over time, these O-rings can dry out, crack, or become flattened, leading to leaks or a loose handle. Replacing the O-rings is a relatively simple process. After disassembling the handle, carefully remove the old O-rings using a small pick or screwdriver. Clean the surfaces where the O-rings were located and then lubricate the new O-rings with plumber's grease before installing them. Plumber’s grease helps prevent the O-rings from drying out and ensures a watertight seal.
The cartridge is a critical component that controls the water flow and temperature. If the cartridge is damaged or worn out, it can cause leaks, difficulty in controlling the water temperature, or a handle that rotates freely without controlling the water flow. Replacing the cartridge involves removing the handle, removing a retaining clip or nut, and then carefully pulling out the old cartridge. Before installing the new cartridge, ensure that it is properly aligned with the faucet body. Apply plumber's grease to the cartridge before inserting it to ensure smooth operation and prevent leaks.
Set screws are small screws that secure the handle to the valve stem. If the set screw is loose or stripped, the handle may wobble or detach from the faucet. Replacing the set screw is a straightforward process. Simply remove the old set screw and replace it with a new one of the same size and type. Ensure that the set screw is tightened securely, but avoid over-tightening, which could damage the valve stem.
Valve stems are the rods that connect the handle to the cartridge. If the valve stem is stripped or broken, the handle will not be able to control the water flow. Replacing the valve stem typically involves disassembling the faucet and removing the old valve stem. Install the new valve stem, ensuring that it is properly aligned with the handle and the cartridge.
Key Point 3: Reassembling and Testing the Faucet
After replacing any worn or damaged components, the final step is to reassemble the faucet and test its functionality. Reassembly involves reversing the disassembly process, carefully reattaching the handle, decorative caps, and any other components that were removed. Ensure that all screws and nuts are tightened securely, but avoid over-tightening, which could damage the faucet. Before turning the water supply back on, inspect all connections to ensure that they are properly sealed.
Once the faucet has been reassembled, slowly turn the water supply back on. Check for any leaks around the handle, spout, and base of the faucet. If any leaks are detected, immediately turn off the water supply and re-examine the connections. Tighten any loose fittings or replace any damaged O-rings or seals. Once all leaks have been eliminated, test the faucet's functionality. Turn the handle to adjust the water flow and temperature. Ensure that the handle operates smoothly and that the water flows properly. Also, check for any unusual noises, such as squealing or grinding, which could indicate a problem with the cartridge or other internal components.
If the faucet continues to leak or malfunction after reassembly, it may be necessary to consult a professional plumber. A plumber has the expertise and tools to diagnose and repair more complex faucet problems, such as damaged pipes or hidden leaks. It is also important to follow the manufacturer's instructions for cleaning and maintaining the faucet. Regular cleaning and maintenance can help prevent mineral buildup and corrosion, extending the life of the faucet and ensuring its optimal performance.
Maintaining a Delta bathroom faucet requires diligent care. Regularly cleaning the faucet with a non-abrasive cleaner can prevent mineral buildup and preserve its finish. Avoid using harsh chemicals or abrasive cleaners, as they can damage the faucet's surface. Periodically inspect the faucet for any signs of leaks or damage. Addressing minor issues promptly can prevent them from escalating into more serious problems. By following these maintenance tips, homeowners can ensure that their Delta bathroom faucet remains in good working condition for many years to come.
In addition to the steps outlined above, it is also beneficial to consult the Delta Faucet Company's website or contact their customer service department for specific instructions and troubleshooting tips related to your particular faucet model. Delta provides detailed documentation and support for its products, which can be invaluable in resolving faucet problems. With patience, attention to detail, and the proper tools, repairing a Delta bathroom faucet handle is a manageable task that can save homeowners significant expense.
Remember to keep all small parts, such as screws and O-rings, in a safe place during the repair process to avoid losing them. A small container or bag can be helpful for organizing these parts. Also, take photographs of the faucet before disassembling it. These photos can serve as a reference during reassembly, ensuring that all components are reinstalled correctly. If you are unsure about any step of the repair process, do not hesitate to seek assistance from a professional plumber. Incorrect repairs can potentially damage the faucet or lead to costly plumbing problems.
Repairing a Delta bathroom faucet handle is an achievable undertaking, empowering homeowners to maintain their plumbing fixtures effectively. By accurately diagnosing the issue, replacing worn components with genuine Delta parts, and carefully reassembling and testing the faucet, individuals can restore their faucet to optimal working condition. This proactive approach not only saves money but also contributes to the longevity and efficient operation of the bathroom's plumbing system.

How To Fix Leaky Bathroom Handle Delta Faucet Model 4530 Series Hard Water

How To Repair Leaking Dripping Delta Faucet Diyplumbing Serviceplumbing Tappplumbing

Repair Parts For One And Two Handle Delta Bathroom Faucets

How To Fix A Leaky Delta Two Handle Faucet

Delta Faucet Repair Parts In 2024 Bathroom

Simple Ways To Fix A Leaky Delta Bathroom Sink Faucet

Brasscraft Delta Bath Faucet Repair Kit Single Handle Killingworth True Value

How To Replace A Two Handle Faucet Delta Blog

How To Repair A Delta Tub Shower Valve

Old Delta Shower Faucet Repair Made Easy
Related Posts


