Tile Bathroom Vanity Backsplash: A Comprehensive Guide
A bathroom vanity backsplash serves a crucial function, protecting the wall behind the sink from water damage, soap scum, and other everyday messes. Beyond its protective purpose, the backsplash also contributes significantly to the bathroom's overall aesthetic. Tile, due to its durability, water resistance, and vast array of design options, is a popular and practical choice for bathroom vanity backsplashes. This article provides a comprehensive guide to selecting, installing, and maintaining a tile bathroom vanity backsplash.
Understanding the Purpose and Benefits of a Tile Backsplash
The primary function of a bathroom vanity backsplash is to shield the wall from moisture. Constant exposure to water can lead to mold growth, paint peeling, and structural damage. A properly installed tile backsplash creates a waterproof barrier, preventing these problems. Furthermore, a backsplash protects the wall from stains caused by toothpaste, soap, and other toiletries. Cleaning a tiled surface is significantly easier than attempting to remove stains from painted drywall. Tile is generally impervious to staining, allowing for simple cleaning with mild detergents.
Beyond its practical benefits, a tile backsplash elevates the visual appeal of the bathroom. It provides an opportunity to introduce color, texture, and pattern, enhancing the overall design scheme. A well-chosen backsplash can complement the vanity, countertops, and other bathroom fixtures, creating a cohesive and stylish look. The variety of tile options available allows for customization to suit any taste, from minimalist to ornate.
Tile also offers superior durability compared to other backsplash materials such as paint or wallpaper. High-quality tile can withstand years of use without showing signs of wear and tear. This longevity makes tile a cost-effective choice in the long run, as it requires less frequent replacement than less durable materials. The inherent resistance of tile to scratches and fading ensures that the backsplash maintains its appearance for an extended period.
Selecting the Right Tile for Your Bathroom Vanity Backsplash
Choosing the appropriate tile for a bathroom vanity backsplash involves considering several factors, including the size of the backsplash area, the overall bathroom design, and the desired aesthetic. The size of the backsplash area will influence the scale and pattern of the tile selected. A smaller backsplash may benefit from smaller tiles or intricate patterns, while a larger area can accommodate larger tiles or bolder designs. The existing bathroom design should also be taken into account to ensure that the backsplash complements the vanity, countertops, and other features.
Several types of tile are suitable for bathroom vanity backsplashes, including ceramic, porcelain, glass, and natural stone. Ceramic tile is a popular choice due to its affordability, versatility, and ease of maintenance. It is available in a wide range of colors, sizes, and styles, making it easy to find a tile that suits almost any design. Porcelain tile is denser and more durable than ceramic tile, offering increased resistance to water and staining. This makes it a good choice for high-moisture areas.
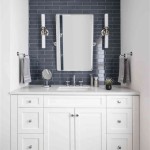
Glass tile provides a sleek and modern look, reflecting light and creating a sense of spaciousness. It is available in various colors and finishes, from clear and translucent to opaque and textured. Glass tile is non-porous and easy to clean, making it a practical choice for a bathroom vanity backsplash. Natural stone tile, such as marble, granite, or travertine, offers a luxurious and timeless aesthetic. Each stone tile is unique, adding character and individuality to the bathroom. However, natural stone requires more maintenance than other types of tile, including regular sealing to prevent staining.
The finish of the tile is another important consideration. Glossy tiles reflect more light and create a brighter look, but they can also be more slippery when wet. Matte tiles offer a more subdued appearance and provide better traction, making them a safer choice for areas prone to moisture. Textured tiles add dimension and visual interest, but they may require more effort to clean.
Grout is a crucial component of any tile backsplash installation. It fills the spaces between the tiles, providing a waterproof seal and preventing moisture from penetrating the wall. Epoxy grout is a highly durable and stain-resistant option, making it ideal for bathroom applications. Cement-based grout is a more traditional choice, but it requires regular sealing to maintain its water resistance. The color of the grout can significantly impact the overall appearance of the backsplash. A contrasting grout color can highlight the shape and pattern of the tiles, while a matching grout color creates a more seamless look.
Installation Techniques and Best Practices
Proper installation is essential for ensuring the longevity and performance of a tile bathroom vanity backsplash. The first step is to prepare the wall surface by cleaning it thoroughly and ensuring that it is smooth and level. Any existing paint or wallpaper should be removed, and any holes or cracks should be filled with patching compound. A primer should then be applied to the wall to improve the adhesion of the tile adhesive.
Before starting the tile installation, it is important to plan the layout and determine the placement of the tiles. A level should be used to draw a horizontal line across the wall, representing the bottom edge of the backsplash. Starting from this line, the tiles can be dry-laid to ensure a proper fit and alignment. Any necessary cuts should be made using a tile saw or nippers.
Tile adhesive, also known as thin-set mortar, should be applied to the wall using a notched trowel. The size of the trowel notch will depend on the size and type of tile being used. The adhesive should be applied in a thin, even layer, covering only the area that can be tiled within a reasonable amount of time. The tiles should then be pressed firmly into the adhesive, ensuring that they are level and aligned. Tile spacers should be used to maintain consistent spacing between the tiles.
Once the adhesive has dried, the tile spacers can be removed, and the grout can be applied. Grout should be spread over the tiles using a grout float, pressing it firmly into the spaces between the tiles. Excess grout should be removed with a damp sponge, working diagonally across the tiles. After the grout has dried slightly, the tiles should be cleaned with a clean, dry cloth.
Caulk should be applied along the edges of the backsplash where it meets the vanity and the wall. This creates a waterproof seal and prevents water from seeping behind the backsplash. Silicone caulk is a good choice for this application, as it is flexible and resistant to mold and mildew. The caulk should be applied in a smooth, even bead and smoothed with a caulk smoothing tool.
Proper ventilation is crucial during the installation process, especially when working with adhesives and grouts. Open windows and use fans to ensure adequate airflow. Safety precautions should also be taken, including wearing gloves and eye protection to prevent irritation and injury.
Maintenance and Care for a Tile Backsplash
Regular cleaning and maintenance are essential for preserving the appearance and longevity of a tile bathroom vanity backsplash. After each use, the backsplash should be wiped down with a damp cloth to remove any water splashes or spills. This will prevent the buildup of soap scum and other stains.
For more thorough cleaning, a mild detergent or tile cleaner can be used. Avoid using abrasive cleaners or scrub brushes, as these can scratch the surface of the tile. Vinegar and water can be used to remove hard water stains and soap scum. Baking soda paste can be used to remove stubborn stains.
The grout should be sealed regularly to prevent staining and water damage. Grout sealer should be applied according to the manufacturer's instructions. Regular sealing will help to keep the grout looking clean and new for longer.
Any cracks or chips in the tile should be repaired promptly to prevent water from penetrating the wall. Small cracks can be filled with epoxy filler, while larger chips may require replacing the entire tile. If a tile needs to be replaced, the old tile should be carefully removed, and the new tile should be installed using the same techniques as described above.
By following these maintenance and care tips, a tile bathroom vanity backsplash can provide years of beauty and protection. Regular cleaning and sealing will help to keep the backsplash looking its best and prevent costly repairs in the future.

62 Bathroom Backsplash Ideas For A Stylish Makeover In 2024 White Subway Tile Vanity Designs

15 Bathroom Backsplash Ideas

62 Bathroom Backsplash Ideas For A Stylish Makeover In 2024 Remodel Tile Vanity

Unique Bathroom Vanity Backsplash Ideas Glass Stone Ceramic Tile

Do Bathroom Vanities Need A Backsplash

Shiplap Bathroom Backsplash Design Ideas

Brilliant Bathroom Backsplash Ideas In 2024 Tile Vanity

24 Ideas For A Creative Bathroom Backsplash

47 Modern Bathroom Backsplash Sleek Plain Tile Designs

Do You Need A Backsplash For Your Bathroom Vanity Diamond Kitchen Bath
Related Posts