How To Fix a Dripping Bathroom Faucet with Double Handles
A dripping bathroom faucet can be an annoying and wasteful problem. Not only does it create a constant sound that can disrupt your peace, but it also contributes to wasted water and increased utility bills. Fortunately, fixing a dripping double-handle bathroom faucet is often a simple task that can be done with basic tools and a little bit of know-how. This article will guide you through the process of identifying the problem, gathering the necessary materials, and repairing the faucet yourself.
Understanding the Problem
There are several reasons why a double-handle bathroom faucet might drip. The most common culprits are worn-out washers, loose packing nuts, or a faulty cartridge. To determine the specific issue, it's essential to observe the faucet carefully:
- Dripping from both handles: This usually indicates worn-out washers or loose packing nuts in both valve stems.
- Dripping from only one handle: This suggests a problem with the washer, packing nut, or cartridge in the specific valve stem.
- Constant dripping: This typically means the problem is with the washers or packing nuts.
- Dripping only when the faucet is turned on: This could indicate a faulty cartridge or a problem with the faucet's internal seals.
Once you've pinpointed the source of the drip, you can proceed with the appropriate repair.
Materials and Tools
Before you start working on your faucet, gather the necessary materials and tools. These include:
- Adjustable wrench
- Channel-lock pliers
- Flat-head screwdriver
- Phillips-head screwdriver
- Replacement faucet washers
- Replacement packing nuts (if needed)
- Replacement cartridge (if needed)
- Plumber's tape
- Bucket
- Towel
It's always best to consult your faucet's manufacturer's instructions or find a repair guide specific to your model for the most accurate replacement parts needed.
Repairing the Faucet
Now, let's delve into the steps for repairing a dripping double-handle bathroom faucet. Keep in mind that the following instructions are general guidelines and may vary depending on your specific faucet design.
1. Turn off the Water Supply
Find the shut-off valves for your bathroom faucet. They are typically located beneath the sink or on the wall. Turn the valves clockwise to completely stop the water flow.
2. Drain the Faucet
Open the faucet handles to release any remaining water in the pipes. Place a bucket underneath to catch the water.
3. Remove the Handle and Bonnet
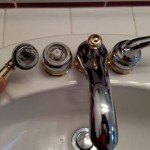
Use a flat-head screwdriver to remove the handle screws. Once the screws are removed, carefully pull off the handle. Next, locate the bonnet, which is the cover that sits on top of the valve stem. Unscrew the bonnet using an adjustable wrench or channel-lock pliers.
4. Inspect and Replace the Washer
With the bonnet removed, you'll see the valve stem and the washer. The washer is a small, rubber or ceramic disc that sits on top of the stem. Inspect the washer for wear and tear. If it's cracked, worn, or discolored, it needs to be replaced. If you haven't replaced the washers before, it's a good idea to replace both washers, even if only one is dripping. To remove the old washer, simply pull it off the stem. Place the new washer on the stem, ensuring it's seated properly.
5. Inspect and Tighten the Packing Nut
The packing nut is a metal ring that sits beneath the washer. It helps seal the valve stem and prevent leaks. Inspect the packing nut for any signs of damage or looseness. To tighten the packing nut, use an adjustable wrench or channel-lock pliers to turn it clockwise. However, be cautious not to overtighten it, as this could damage the valve stem or packing nut.
6. Reassemble the Faucet
Once you've inspected and replaced the washer and packing nut, reassemble the faucet in reverse order. First, screw the bonnet back onto the valve stem. Then, replace the handle and tighten the screws. Repeat this process for both handles if necessary. Finally, turn the water supply back on and test the faucet for leaks.
7. Replace the Cartridge (If Needed)
If the faucet continues to drip after replacing the washer and packing nut, you may need to replace the cartridge. The cartridge is a sealed unit containing the valve stem, washer, and other internal components. To replace the cartridge, follow these steps:
- Turn off the water supply and drain the faucet as described earlier.
- Remove the handle and bonnet as described earlier.
- Locate the cartridge, which is usually a cylindrical or rectangular component that sits inside the valve stem assembly. It may be held in place by a retaining nut or clip.
- Remove the cartridge by unscrewing the retaining nut or removing the clip. The specific method will vary depending on your faucet model.
- Install the new cartridge by reversing the removal process.
- Reassemble the faucet and test it for leaks.
It is important to refer to your faucet's manufacturer's instructions for specific replacement parts and procedures.
Conclusion
Fixing a dripping double-handle bathroom faucet is a relatively straightforward task that can save you money on wasted water and frustration. By following these steps and taking your time, you can successfully repair your faucet and enjoy a leak-free bathroom. If you're uncomfortable or inexperienced with plumbing work, it's always best to call a professional plumber for assistance.

4 Easy Ways To Fix A Leaky Bathroom Sink Faucet With Double Handle

How To Fix A Dripping Or Leaky Double Handle Faucet

4 Easy Ways To Fix A Leaky Bathroom Sink Faucet With Double Handle

How To Fix Leaky Bathroom Handle Delta Faucet Model 4530 Series Hard Water

4 Easy Ways To Fix A Leaky Bathroom Sink Faucet With Double Handle

How To Fix A Leaky Faucet The Home Depot

How To Fix A Leaky Faucet Leaking Kitchen Repair Moen

How To Fix A Dripping Bathroom Sink Faucet Double Handle

How To Fix A Leaking Bathtub Faucet Diy Family Handyman

How To Fix A Leaky Faucet True Value
Related Posts


