How To Get A New Bathroom Sink Stopper
A functional bathroom sink stopper is essential for everyday hygiene and convenience. A malfunctioning stopper can lead to water wastage, unpleasant odors, and even potential damage to the sink and plumbing. Fortunately, replacing a sink stopper is often a straightforward DIY project that can be completed with a few basic tools and some readily available replacement parts. This article provides a comprehensive guide to identifying the type of stopper needed, removing the old one, and installing the new one, ensuring a properly sealed and functional bathroom sink.
Before embarking on the replacement process, it is crucial to identify the type of sink stopper currently installed. Different types of stoppers require different replacement parts and installation methods. Common types include pop-up stoppers, lift-and-turn stoppers, push-and-seal stoppers, and traditional rubber stoppers. Understanding the existing mechanism is the first step toward a successful replacement.
Identifying Your Current Sink Stopper Type
The most prevalent type of sink stopper is the pop-up stopper. This type is characterized by a lever, typically located behind the faucet, that controls the raising and lowering of the stopper. When the lever is lifted, it engages a mechanism beneath the sink that pulls the stopper up, allowing water to drain. Lowering the lever reverses this action, sealing the drain. Identifying a pop-up stopper is relatively simple due to the presence of the control lever.
Lift-and-turn stoppers, as the name suggests, are operated by lifting the stopper itself and turning it to lock it in either the open or closed position. They are often found in older sinks. Inspecting the stopper itself will reveal a mechanism that allows it to be lifted and turned to control the water flow. This type of stopper is self-contained and doesn't usually have external linkages.
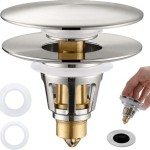
Push-and-seal stoppers are a more modern design. They function by simply pressing down on the stopper to seal the drain and pressing again to release it. These are easily recognizable by their smooth, button-like appearance. There is no external lever or lift-and-turn mechanism associated with this type of stopper.
Traditional rubber stoppers are the simplest type. They are essentially rubber plugs that are manually inserted into the drain to stop water flow. These stoppers are easily identifiable by their basic design and lack of any mechanical apparatus. They are typically connected to a small chain to prevent them from being lost.
Once the type of existing stopper has been identified, the appropriate replacement part can be purchased. Most hardware stores and home improvement centers carry a wide selection of sink stoppers and related components. When selecting a replacement, it is important to ensure that it is compatible with the sink and drain assembly. Taking the old stopper with you to the store can be helpful to ensure a proper match.
Removing the Old Sink Stopper
The removal process varies depending on the type of stopper in place. However, some general steps apply to most scenarios. First, gather the necessary tools, which typically include a basin wrench, pliers, a screwdriver (either Phillips head or flathead, depending on the set screw), and a bucket to catch any water or debris. It is advisable to place a towel or cloth beneath the sink to protect the floor from spills.
For pop-up stoppers, the initial step involves locating the pivot rod beneath the sink. This rod connects the stopper control lever to the stopper itself. Carefully detach the pivot rod from the clevis strap, which is the vertical piece connected to the drainpipe. In some cases, the pivot rod may be held in place by a retaining clip or a nut. Once the pivot rod is disconnected, the stopper can usually be lifted out of the drain opening. If the stopper is stuck, gently wiggle it or use pliers to carefully loosen it.
Removing a lift-and-turn stopper is usually less complicated. In most cases, the stopper can simply be lifted out of the drain after turning it to an unlocked position. If it is stuck, try gently twisting and pulling simultaneously. Some lift-and-turn stoppers may have a set screw that needs to be loosened before they can be removed. This screw is typically located on the side of the stopper. Use a screwdriver to loosen the set screw, and then try lifting the stopper out.
Push-and-seal stoppers often require a slightly different approach. Some push-and-seal stoppers can be pulled straight out, while others require a twisting motion. Consult the manufacturer's instructions for specific removal instructions. If the stopper is difficult to remove, try gently prying it up with a flathead screwdriver, being careful not to damage the sink or the stopper itself.
Traditional rubber stoppers are the easiest to remove, simply by pulling them out of the drain. If the stopper is old and brittle, it may crumble during removal. In this case, use pliers to carefully remove any remaining fragments from the drain opening.
After removing the old stopper, thoroughly clean the drain opening. Remove any debris, hair, or buildup that may have accumulated. This step is crucial for ensuring a proper seal with the new stopper. A small brush or a damp cloth can be used to clean the drain thoroughly.
Installing the New Sink Stopper
The installation process is essentially the reverse of the removal process, with some important considerations. Before installing the new stopper, ensure that all necessary components are present and in good condition. Check the rubber washers and seals for any signs of damage or wear. Replace any damaged components before proceeding.
For pop-up stoppers, begin by inserting the new stopper into the drain opening. Ensure that it is properly aligned with the pivot rod opening. Next, reattach the pivot rod to the clevis strap. Make sure that the pivot rod is securely connected and that the stopper moves freely when the control lever is operated. Adjust the clevis strap as needed to achieve the desired stopper height and sealing performance. Test the stopper by filling the sink with water and checking for leaks. If leaks are present, tighten the connections or adjust the position of the stopper.
Installing a new lift-and-turn stopper is typically straightforward. Simply insert the stopper into the drain opening and turn it to lock it in place. If the stopper has a set screw, tighten it to secure the stopper. Test the stopper by filling the sink with water and checking for leaks. Adjust the set screw as needed to ensure a proper seal.
For push-and-seal stoppers, align the stopper with the drain opening and press it firmly into place. Ensure that the stopper is securely seated and that it operates smoothly. Test the stopper by filling the sink with water and checking for leaks. If leaks are present, try pressing the stopper more firmly or consult the manufacturer's instructions for troubleshooting.
Installing a traditional rubber stopper is the simplest procedure. Simply insert the stopper into the drain opening, ensuring that it fits snugly. Test the stopper by filling the sink with water and checking for leaks. If leaks are present, try using a slightly larger stopper or ensuring that the drain opening is clean and free of debris.
After installing the new stopper, thoroughly test its functionality. Fill the sink with water and observe whether the stopper effectively seals the drain. Check for leaks around the stopper and beneath the sink. If any leaks are detected, carefully inspect the connections and seals. Tighten any loose connections and replace any damaged seals. It is also advisable to run water through the drain for a few minutes to ensure that there are no hidden leaks.
Once the new stopper is installed and tested, clean up the work area. Remove any tools, debris, or spills. Dispose of the old stopper and any packaging materials properly. A properly installed sink stopper can significantly improve the functionality and convenience of the bathroom. By following these steps, homeowners can confidently replace their sink stoppers and enjoy a leak-free and efficient bathroom drain.
In addition to the primary installation steps, consider applying plumber's putty or Teflon tape to threaded connections to enhance leak protection. Plumber's putty creates a watertight seal around drain flanges, while Teflon tape helps to seal threaded joints. These materials are readily available at most hardware stores and can provide an extra layer of protection against leaks.
Preventative Measures and Maintenance
To prolong the life of the new sink stopper and prevent future problems, adopt some simple preventative measures. Regularly clean the drain opening to remove hair, soap scum, and other debris that can accumulate and interfere with the stopper's operation. Use a drain snake or a chemical drain cleaner to clear any clogs that may form in the drainpipe. Avoid pouring harsh chemicals down the drain, as they can damage the stopper and the plumbing.
Periodically inspect the stopper and its components for signs of wear or damage. Check the rubber washers and seals for cracks or deterioration. Replace any worn or damaged parts promptly. Lubricate the stopper mechanism with a silicone-based lubricant to ensure smooth operation. This is particularly important for pop-up stoppers and lift-and-turn stoppers, which have moving parts that can become stiff or corroded over time.
By following these preventative measures, homeowners can minimize the risk of future sink stopper problems and extend the life of their plumbing system. Regular maintenance can also help to identify and address minor issues before they escalate into more serious and costly repairs.

How To Replace A Sink Stopper Quick And Simple Home Repair

How To Replace A Rusty Sink Drain Howtolou Com

Quick Tip 26 Pop Up Stopper Sticks Misterfix It Com

Bathroom Stopper What Missing Here

How To Replace A Sink Stopper Quick And Simple Home Repair
Install A Drain Stopper So The Is Removable

Fixing Tricky Pop Up Drain Sink Stopper Mechanisms Efficient Plumber

How To Replace A Rusty Sink Drain Howtolou Com

How To Replace A Pop Up Sink Drain Remove The Old Bathroom Stopper Repair

How To Replace A Sink Stopper Quick And Simple Home Repair
Related Posts


