How To Make A Small Bathroom Handicap Accessible
Creating a handicap accessible bathroom, particularly in a small space, requires careful planning and execution. The goal is to enhance safety, independence, and comfort for individuals with mobility limitations. This involves adhering to accessibility guidelines, optimizing space, and selecting the right fixtures and features. This article provides a detailed guide on how to transform a small bathroom into a functional and accessible environment.
Understanding Accessibility Standards and Guidelines
Before initiating any modifications, it is crucial to understand the relevant accessibility standards and guidelines. The Americans with Disabilities Act (ADA) sets forth minimum requirements for accessible design in public accommodations and commercial facilities. While these standards are not mandatory for private residences, they serve as a valuable benchmark for creating a truly accessible space. Many state and local building codes also incorporate accessibility standards, which must be followed during renovation projects. Consulting with a Certified Aging-in-Place Specialist (CAPS) or a qualified architect can ensure the project complies with all applicable regulations and best practices.
Key ADA guidelines relevant to bathroom accessibility include requirements for clear floor space, turning radius, grab bar placement, toilet height, sink clearance, and door width. These measurements are designed to accommodate wheelchair users and individuals with other mobility aids. While strict adherence to ADA standards might be challenging in a small bathroom, striving to meet these guidelines as closely as possible will significantly improve accessibility.
A critical aspect of accessibility is understanding the specific needs of the individual who will be using the bathroom. Factors such as the person's height, reach, strength, and type of mobility aid will influence the optimal placement of fixtures and accessories. A personalized assessment can help tailor the design to meet individual requirements, ensuring maximum comfort and independence.
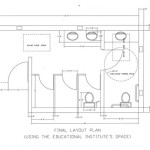
Optimizing Space and Layout in a Small Bathroom
Maximizing space is paramount when converting a small bathroom into an accessible environment. This often involves reconfiguring the layout, replacing bulky fixtures with compact models, and utilizing storage solutions that minimize clutter and maximize usable space.
One of the first considerations is the door. Ideally, the bathroom door should have a minimum width of 32 inches to accommodate a wheelchair or walker. If the existing doorway is narrower, widening it may be necessary. A swing-clear hinge can add an extra inch or two of clearance. Alternatively, a pocket door, which slides into the wall cavity, can eliminate the space required for a swinging door altogether. This is particularly beneficial in a small bathroom where every inch counts.
The toilet is a key element in bathroom accessibility. The ADA recommends a toilet seat height of 17 to 19 inches from the floor. This height makes it easier for individuals to transfer from a wheelchair or walker. Comfort height toilets, which meet this standard, are readily available. The clear floor space around the toilet should be at least 30 inches wide and 48 inches deep to allow for maneuvering. Positioning the toilet away from corners and walls will provide more accessible space. Installing grab bars on the wall adjacent to the toilet and behind the toilet is essential for providing support and stability.
The sink and vanity area also require careful consideration. A wall-mounted sink, also known as a pedestal sink, or a vanity with open space underneath allows wheelchair users to roll up close to the sink. The sink should be no more than 34 inches above the floor, and the knee clearance under the sink should be at least 27 inches high, 30 inches wide, and 19 inches deep. Insulating the drain pipes under the sink prevents burns from hot water. Lever-handled faucets are easier to operate than traditional knob-style faucets. A single-handle faucet or touchless faucet offers even greater ease of use.
The shower or tub area presents another set of challenges in a small bathroom. Replacing a traditional bathtub with a roll-in shower is often the best option for accessibility. A roll-in shower eliminates the need to step over a high threshold, making it easier and safer for individuals with mobility limitations to enter and exit the shower. The shower should have a minimum size of 30 inches by 60 inches to accommodate a wheelchair. A folding shower seat provides a place to sit while showering. A handheld showerhead with a long hose allows for greater flexibility and control. Grab bars should be installed on the walls of the shower for support and stability. A curbless shower design, where the shower floor is flush with the bathroom floor, eliminates the need for any threshold at all. If a bathtub must be retained, a walk-in tub with a side-entry door can provide a safer bathing experience.
Proper lighting is crucial for safety and visibility in an accessible bathroom. Install bright, even lighting throughout the room, including task lighting above the sink and in the shower area. Motion-activated lights can be particularly helpful for individuals who have difficulty reaching light switches. Nightlights can also improve safety during nighttime visits to the bathroom.
Storage solutions should be designed to be easily accessible. Shelves and cabinets should be within reach from a seated position. Pull-down shelves and lazy Susans can make it easier to access items stored in high or deep cabinets. Consider using clear storage containers to easily identify contents. Avoid cluttering the floor with unnecessary items. Keeping the floor clear of obstacles will reduce the risk of falls.
Selecting Accessible Fixtures and Features
Choosing the right fixtures and features is essential for creating a truly accessible bathroom. These include toilets, sinks, showers, grab bars, and other accessories designed to enhance safety, comfort, and independence.
As previously mentioned, a comfort height toilet is a critical component of an accessible bathroom. Look for models with elongated bowls, which provide added comfort. Consider a bidet toilet seat, which provides enhanced hygiene and independence. A bidet seat can be particularly helpful for individuals who have difficulty reaching or bending.
For sinks, wall-mounted or pedestal sinks are preferable, as they provide ample knee clearance for wheelchair users. Choose a sink with a shallow basin to minimize reaching. Faucets with lever handles, single-handle controls, or touchless operation are easier to use than traditional knob-style faucets. Install insulated pipes under the sink to prevent burns from hot water.
Roll-in showers are the gold standard for accessibility. Choose a shower with a low or no threshold to eliminate tripping hazards. Install a folding shower seat to provide a place to sit while showering. A handheld showerhead with a long hose allows for greater flexibility and control. Grab bars should be installed on the walls of the shower for support and stability. Consider adding a shower caddy to keep toiletries within easy reach.
Grab bars are essential safety features in an accessible bathroom. Install grab bars near the toilet, in the shower, and near the sink. Grab bars should be securely mounted to the wall studs. Look for grab bars that meet ADA standards for diameter, length, and load capacity. Choose grab bars with a textured surface for improved grip. Consider installing swing-away grab bars, which can be moved out of the way when not needed.
Non-slip flooring is another important safety consideration. Choose a flooring material with a high coefficient of friction to reduce the risk of slips and falls. Textured tiles, rubber flooring, and vinyl flooring are all good options. Avoid using rugs or mats, which can create tripping hazards. If you must use a rug, choose one with a non-slip backing.
Finally, consider adding accessories that can enhance accessibility, such as a raised toilet seat, a commode chair, or a transfer bench. These items can provide additional support and assistance for individuals with mobility limitations. The specific accessories needed will depend on the individual's specific needs and preferences.
By carefully planning the layout, selecting appropriate fixtures, and adhering to accessibility guidelines, it is possible to transform a small bathroom into a safe, comfortable, and accessible environment for individuals with mobility limitations.

How To Make A Bathroom Handicap Accessible American Bath Enterprises

Design A Wheelchair Accessible Senior Bathroom

How To Design A Wheelchair Accessible Shower And Bathroom Innovate Building Solutions

5 Remodeling Ideas To Make Your Bathroom More Accessible Metropolitan Bath Tile

How To Design An Accessible Bathroom Remodeling Jds Bath

Transforming Your Bathroom To Be Handicap Accessible R D Marble Inc

Top 5 Things To Consider When Designing An Accessible Bathroom For Wheelchair Users Assistive Technology At Easter Seals Crossroads

Make A Small Shower Handicap Accessible

15 Ideas For Designing A Safe Bathroom Older S

5 Tips For Designing Your Accessible Bathroom
Related Posts