How to Remove a Broan Bathroom Vent Fan
Broan bathroom vent fans are a common fixture in many homes. They play a crucial role in removing moisture and odors from the bathroom, keeping the air fresh and preventing mold growth. However, there may come a time when you need to remove the fan, whether for repairs, replacement, or simply to access the wiring behind it. This guide will walk you through the process of safely and efficiently removing a Broan bathroom vent fan.
1. Preparation and Safety
Before starting any work on electrical appliances, it is essential to prioritize safety. Disconnect the power to the fan at the circuit breaker. To avoid confusion, label the breaker before turning it off. To confirm power is off, use a non-contact voltage tester on the fan's wires. Next, remove any decorative covers or grilles surrounding the fan. Depending on the model, these may be held in place by screws, clips, or simply friction.
2. Accessing the Fan Housing
With the power off and the cover removed, you can now start accessing the fan housing itself. This typically involves removing a few screws that secure the fan to the ceiling or wall. Broan fans often have a metal plate or frame surrounding the fan motor. This plate may be held in place by screws or clips that need to be released. Be careful not to bend or damage the plate while removing it, as it might be necessary to reinstall it later.
3. Disconnecting Wiring
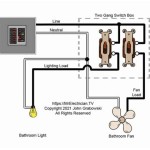
Once the fan housing is free, you can disconnect the electrical wiring. Locate the wires connecting to the fan motor. Typically, there are two wires, one for the hot lead (usually black or red) and another for the neutral lead (usually white). In some cases, there may be a third wire for a ground connection (usually green or bare copper). Carefully disconnect each wire, noting their order and color. Remember, it is vital to disconnect power before working with any electrical wiring to avoid electric shock.
4. Removing the Fan
Now that the wiring is disconnected, you can remove the fan entirely. Depending on the design, it may simply detach from the housing or require some gentle maneuvering to release it. If there are any screws or clips holding the fan in place, remove them carefully. Finally, gently pull the fan down and away from the ceiling or wall. It is crucial to handle the fan with care, as it may contain fragile components.
5. Reinstallation (Optional)
If you are replacing the fan, you can follow these steps in reverse to install the new one: *
Connect the wiring:
Ensure the new fan's wiring connections match the colors of the existing wires. *Secure the fan:
Affix the new fan to the housing using the appropriate screws or clips. *Reinstall housing:
Replace the housing plate and secure it with the original screws or clips. *Replace cover:
Reinstall the decorative cover or grille. *Restore power:
Turn the power back on at the circuit breaker. *Test the fan:
Finally, turn on the fan and ensure it operates correctly.Removing a Broan bathroom vent fan can be a simple DIY task with the right tools and safety precautions. By following these steps carefully and prioritizing safety, you can efficiently remove the fan for maintenance, replacement, or any other purpose. Remember to always disconnect the power before starting any work on electrical appliances and to handle components with care during the removal and reinstallation process.

How To Clean Replace Light Broan Model 678 Exhaust Fan

Remove Install A Bathroom Fan Grille In 1 Min

Replace A Bathroom Fan Broan

How To Remove Broan Bhfled80 Bathroom Fan Heater Assembly And Trouble Shoot

How To Replace Broan 670 671 And 688 Bathroom Fan Assembly

Broan Nutone Invent Bath Fan Installation

How To Install Bathroom Heater Exhaust Fan Broan Nutone Bhf110

Broan Nutone Fgr101s Economy Replacement Square Ceiling Bathroom Ventilation And Exhaust Fans Easy Diy Installation White Grille Cover Com

Broan Nutone 80 Cfm Ceiling Bathroom Exhaust Fan With Light Hb80rl The Home Depot

Broan 70 Cfm 6 Sones Ventilation Fan Com
Related Posts


