How to Remove a Drain Plug From a Moen Bathroom Sink Faucet
Removing a drain plug from a Moen bathroom sink faucet is a common task frequently encountered during routine sink maintenance, repairs, or replacement. The drain plug, also known as a stopper, is a critical component responsible for sealing the drain opening to retain water within the basin. Different Moen faucet models employ various drain plug mechanisms, but the fundamental principles of removal remain largely consistent. This article provides a comprehensive guide to safely and effectively removing a Moen bathroom sink drain plug, encompassing the necessary tools, preparatory steps, and detailed procedures for different drain plug types.
Before initiating the removal process, it's crucial to understand the specific type of drain plug mechanism incorporated into the Moen faucet. The most prevalent types include: Lift Rod or Pop-Up drain, Push Button drain, and twist and turn drain. Identifying the correct type is paramount to employing the appropriate removal technique, thereby preventing potential damage to the faucet or drain assembly. Each type presents unique challenges and requires a tailored approach for successful removal.
Tools and Materials Required
Prior to commencing the removal of the drain plug, gathering the necessary tools and materials is imperative to ensure a smooth and efficient operation. The required implements are typically readily available and include:
*Adjustable Wrench: An adjustable wrench provides versatility in loosening and tightening various nuts and fasteners associated with the drain assembly. The size of the wrench should be appropriate for the components being manipulated.
*Pliers (Slip-Joint or Channel-Lock): Pliers are useful for gripping and manipulating small parts, such as clips or linkages connected to the drain plug mechanism. Slip-joint or channel-lock pliers offer adjustable jaw sizes for accommodating different component dimensions.
*Screwdrivers (Phillips and Flathead): Both Phillips and flathead screwdrivers are essential for removing screws that may secure certain components of the drain assembly. The appropriate screwdriver type should be selected based on the screw head configuration.
*Basin Wrench (Optional): A basin wrench is specifically designed for loosening and tightening nuts in tight spaces, particularly those located behind the sink basin. This tool can be invaluable when access is limited.
*Penetrating Oil (e.g., WD-40): Penetrating oil can be applied to corroded or stuck components to facilitate their loosening and removal. It helps to dissolve rust and grime, allowing for easier disassembly.
*Clean Rags or Towels: Clean rags or towels are necessary for wiping away dirt, debris, and excess water during the removal process. They also provide a protective surface for placing removed components.
*Small Container or Bowl: A small container or bowl is useful for collecting small parts, such as screws, clips, and washers, to prevent them from being lost during disassembly.
*Safety Glasses: Safety glasses are essential for protecting the eyes from debris or splashes that may occur during the removal process.
*Gloves: Wearing gloves protects the hands from dirt, grime, and potential exposure to chemicals or bacteria present in the drain system.
*Flashlight or Work Light: A flashlight or work light provides adequate illumination for working in the often dimly lit area beneath the sink.
Preparation Before Removal
Before attempting to remove the drain plug, it's important to take precautionary measures to ensure safety and facilitate the process. These steps are crucial for preventing damage to the plumbing system and personal injury.
*Turn Off Water Supply: The first and most crucial step is to turn off the water supply to the faucet. This can typically be accomplished by closing the shut-off valves located beneath the sink. Turn both the hot and cold water valves clockwise until they are completely closed. This prevents water from flowing into the sink during the drain plug removal.
*Empty the Sink: Ensure that the sink is completely empty of water. This step is self-explanatory but essential to avoid spillage and mess during the drain plug removal.
*Protect the Work Area: Place towels or cloths beneath the sink to protect the floor or cabinet from water drips and potential damage from tools. This also provides a clean surface for working.
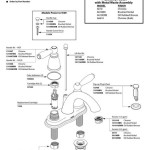
*Familiarize Yourself with the Drain Assembly: Before disassembling anything, take a moment to visually inspect the drain assembly beneath the sink. Identify the various components, such as the drain pipe, pivot rod, clevis screw, and any retaining clips or nuts. Understanding the assembly's configuration will aid in the removal process.
Removing the Drain Plug (Lift Rod/Pop-Up Type)
The lift rod or pop-up drain is a widely used mechanism in Moen bathroom sink faucets. This type of drain is operated by a lift rod located behind the faucet. The removal process generally involves these steps:
*Locate and Loosen the Clevis Screw: Beneath the sink, locate the clevis screw, which connects the lift rod to the pivot rod. The clevis screw typically has a small nut or set screw securing it in place. Use a screwdriver or small wrench to loosen the clevis screw.
*Remove the Pivot Rod: Once the clevis screw is loosened, carefully slide the pivot rod out of the drain assembly. The pivot rod usually has a ball-shaped end that fits into a slot in the drain plug. Be prepared for some water to drip out when the pivot rod is removed.
*Remove the Drain Plug: After the pivot rod is removed, the drain plug should be free to lift out of the drain opening. If the drain plug is stuck, gently wiggle it back and forth while applying upward pressure.
*Clean the Drain Plug and Drain Opening: Once the drain plug is removed, thoroughly clean it and the drain opening to remove any accumulated debris or grime. A mild detergent and brush can be used for cleaning.
Removing the Drain Plug (Push Button Type)
Push button drains are characterized by a button on top of the drain plug. Pressing the button opens and closes the drain. This type often has a more complex mechanism compared to the lift rod type.
*Determine the Release Mechanism: Most push button drains have a release mechanism located beneath the sink or accessible from the top of the drain plug. Sometimes, a rotating mechanism requires you to turn the drain to free it. Identify the type of release of your Moen sink by checking the manual or online resources.
*Access the Mechanism From Below (if applicable): Check to see if there is a rod or linkage beneath the sink that can be detached to allow the drain plug to be removed. If there is, use a wrench or pliers to detach it.
*Remove the Drain Plug: Depending on the design, the drain plug may now be able to be lifted straight out, or it may need to be unscrewed slightly before lifting. Avoid forcing the drain plug, as this could damage the mechanism.
*Clean and Reassemble: Clean all parts thoroughly before reassembling. A descaling solution might be helpful if there is mineral buildup. Once clean, ensure all components are properly aligned during reassembly.
Removing the Drain Plug (Twist and Turn Type)
Twist and turn drain plugs have a mechanism whereby the drain plug is rotated to open or close the drain. This type of drain plug offers a streamlined look and easy operation. Removing these plugs requires a precise approach.
*Identify the Release Position: Usually, this type of drain is held in place by a locking mechanism activated by its twisting motion. Experiment with the twisting motion to determine the release position which will disengage the locking mechanism.
*Gently Lift the Plug: Once in the release position, the plug should lift out relatively easily. Avoid excessive force, as this could damage the threads or the locking mechanism. A slight wiggle may be necessary.
*Inspect and Clean: Examine the drain plug for any signs of wear or damage. The O-rings and the threads are particularly important. Clean all components with a mild detergent to remove any buildup that could impede operation.
Dealing with Stubborn Drain Plugs
Occasionally, drain plugs may become stubbornly stuck due to corrosion, mineral buildup, or accumulated debris. In such instances, employing the following techniques can facilitate removal:
*Apply Penetrating Oil: Apply penetrating oil, such as WD-40, around the base of the drain plug and allow it to soak for several minutes. The penetrating oil will help to dissolve rust and grime, making it easier to loosen the plug.
*Gently Wiggle and Rotate: Gently wiggle and rotate the drain plug back and forth while applying upward pressure. This motion can help to break the bond between the plug and the drain opening.
*Use Pliers for Grip: If the drain plug is difficult to grip, use pliers to provide additional leverage. Wrap a cloth around the drain plug to protect it from scratches.
*Apply Heat (Cautiously): Applying heat to the drain plug can help to expand the metal and break the bond. Use a hairdryer or heat gun on a low setting and apply heat sparingly. Be extremely cautious when using heat to avoid damaging the faucet or surrounding materials.
*Seek Professional Assistance: If all else fails, consider seeking professional assistance from a plumber. A plumber possesses the expertise and specialized tools necessary to remove stubborn drain plugs without causing damage to the plumbing system.
Understanding the specific drain plug mechanism and carefully following the appropriate removal steps are essential for successfully removing a Moen bathroom sink drain plug. Taking appropriate precautions and employing patience will greatly increase the likelihood of a smooth and efficient removal process.

How To Remove Clean Moen Bathroom Sink Drain Pop Up Stopper Slow Draining Clogged Hair

Install Moen Bathroom Sink Faucet And Drain

Moen Brantford 8 In Widespread 2 Handle High Arc Bathroom Faucet Trim Kit Oil Rubbed Broe Valve Not Included T6620orb The Home Depot

Bathroom Sink Drain Stopper Not Working

Moen Voss 8 In Widespread 2 Handle High Arc Bathroom Faucet Trim Kit Chrome Valve Not Included T6905 The Home Depot

Moen Adler Double Handle Low Arc 4 In Centerset Bathroom Sink Faucet Watersense Certified Chrome Canadian Tire

Moen Caldwell Spot Resist Brushed Nickel Widespread 2 Handle Watersense Bathroom Sink Faucet With Drain In The Faucets Department At Com

Moen Lindor Brushed Nickel 2 Handle Watersense Labeled Bathroom Sink Faucet 84504srn Rona

Moen Lindor Spot Resist Brushed Nickel 1 Handle Watersense Bathroom Sink Faucet 84505srn Réno Dépôt

Moen 140780 Mon140780 Independent Mechanical Supply
Related Posts